Showing posts with label Breakfast. Show all posts

Tuesday, March 12, 2019

Irish Tea Cake – Was this Barmbrack Wack?

Every year I try to post at least one Irish recipe, and this time around I decided to do something a little out of the ordinary, and try my hand at Barmbrack. I love corned beef and cabbage as much as the next guy, but you can only film it so many different ways. Anyway, the thought of a nice, moist, dense, fruity tea cake for breakfast, with a cup of hot, black tea, sounded just about perfect, and so I started researching this ancient loaf…and researching…and researching, until I had seen and read so many recipes that I didn’t know which direction to go.

There are a huge variety of styles, from light, yeast-raised versions, to super-dense ones, similar to the often-maligned holiday fruitcake. So, I decided to just wing it, and use the force, which usually works out well, but this time, not so much. This is traditionally a Halloween treat, and my experience was equal parts trick and treat.

I’m hearing from my Irish friends on YouTube that I should have probably used baking soda, plus more tea to get a little more rise. They also say that using half wholegrain flour will inhibit the verticality as well. Notwithstanding my results, at the very least, I’ve hopefully made some of you aware of barmbrack, and maybe you’ll give it a try soon. Enjoy!


Ingredients for one 9” x 5” loaf pan:
2 cups warm black tea
1⁄2 cup golden raisins
1⁄2 cup dried cherries
1/4 cup dried currants
1 cup all-purpose flour
1 cup whole grain flour (I’m told this makes the loaf a lot heavier, so maybe use all regular flour)
1 1/2 teaspoons baking powder (I’m told I should’ve probably added a teaspoon of baking soda)
1 teaspoon kosher salt
1 teaspoon cinnamon
1⁄2 teaspoon ground nutmeg
1/4 teaspoon ginger
1/8 teaspoon ground cloves
1⁄4 cup light brown sugar
1 large egg
1⁄4 cup milk
2 tablespoons reserved black tea
1 tablespoon Irish whiskey or any whiskey
1 tablespoon lemon zest
1 tablespoon orange zest
1/4 teaspoon vanilla
6 tablespoons melted butter
-->

Tuesday, March 5, 2019

Kouign-Amann – Yas Queen!

The fact that Kouign-Amann (Pronounced “Queen-a-mahn”) have become a popular item in bakeries across America is quite a tribute to just how incredible they really are, since to stock something that no one can spell or pronounce is generally considered a retail sales no-no. As you may know, I pride myself on mispronouncing things, but even I don’t like to be corrected by a salesperson, and their judgmental, I can’t believe you just said “kooeegan-aman” look.

Yet, despite the difficult name, they’ve thrived for the very simple reason that this is one of the world’s great pastries. Maybe thegreatest. I guess that depends on who you talk to, but the irresistible combination of sweet, salty, sticky, buttery, crispy, flaky, and tender, is hard to beat.

I guess you could just buy some frozen puff pasty, or croissant dough, and skip to the last step, but unlike many of those, the base here is a fairly lean bread dough, which I think is one of the secrets. A richer milk-based dough, which already contains lots of butter and sugar, won’t necessarily provide the same contrast.

Speaking of secrets, I think the real magic of these is the salt. Apparently the authentic ones are fairly salty, and just as savory, as they are sweet, but you don’t want to over do it. I suggest starting with less than I call for in your seasoned sugar mix, and then tasting on a wet finger to see where you’re at. Then, add more until you think it’s right.

Part of me hopes you have a bakery that does these nearby, so you can easily taste them for yourself, but another part of me hopes you don’t, so you’ll try to make them. Either way, you’re in for a huge treat. Enjoy!


Ingredients for 12 Kouign-Amann:
For the dough:
1 cup warm water
1 teaspoon dry active yeast
1 tablespoon sugar
1 tablespoon melted unsalted butter
2 1/2 cups bread flour, plus more as needed
1 teaspoon kosher salt
For the seasoned sugar (mix, taste, and adjust):
2/3 cup white sugar
2 teaspoons of sea salt or kosher salt (less if you’re using a fine table salt)
For the rest:
8 ounces ice cold unsalted butter (2 sticks) for the pastry
1 tablespoon melted butter for the muffin pan
-->

Friday, October 12, 2018

Chicken Apple Sausage Patties – Doesn’t Feel Like Chicken

Imagine a sausage patty made from chicken that’s just as tender, juicy, and flavorful as one made from pork. What? A not-dry, not-rubbery feeling chicken-based sausage? Sounds impossible, and it is, unless you sneak in a little bit of pancetta, and follow a few simple techniques.

Instead of buying ground chicken at the market, which is always too finely ground, we’re going to use thighs, and grind our own. This makes for a significantly more succulent and tender patty, as long as you keep the meat very cold while working with it. I like to pulse it on and off in the food processer, but your can also use your grinder attachment, or go low-tech, and just chop it finely with a big knife or cleaver.

As I mentioned in the video, if you’re not into patties, you can make links, or simply crumble the raw mixture into a hot pan, and break it up as it cooks. Once browned, you can add your butter and flour, and continue with the pan sauce. Besides saving you a little time, this method probably makes for the most flavorful gravy.

By the way, most chicken apple sausage recipes call for some kind of sugar to be added, but I really don’t think it’s necessary, thanks to the natural sugar in the apples. As with all ground meat recipes, you can always fry up a small piece of your mixture, and test for yourself, but for me, the little touch of maple syrup in the sauce is all the extra sweetness this needs. Either way, I really do hope you give these chicken apple sausage patties a try soon. Enjoy!


Ingredients for 8 Chicken Apple Sausage Patties (about 4 ounces each):
For the sausage:
1 1/2 pounds boneless, skinless chicken thighs
4 ounces pancetta or bacon
2 teaspoons kosher salt, or to taste
1 teaspoon freshly ground black pepper
1/4 teaspoon dried thyme
1/2 teaspoon crushed fennel seeds (toast in dry pan until fragrant)
1/4 teaspoon ground coriander
1/4 teaspoon cayenne
1/4 teaspoon freshly grated nutmeg
2 teaspoons finely minced fresh sage
2 Granny Smith apples, peeled, grated, and squeezed dry

For the Pan Gravy (enough for 8 Patties)
6 tablespoons butter
8 sage leaves, optional (remove when crisp)
6 tablespoons flour
2 1/2 cups chicken broth, plus more if needed
1 tablespoon maple syrup, or to taste
1/3 cup crème fraiche or heavy cream
salt and freshly ground black pepper to taste

- Click here for the Buttermilk Biscuits recipe.

Friday, June 15, 2018

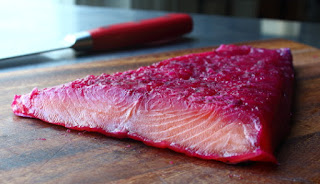
Beet-Cured Salmon Gravlax – Easier and Slower Than You Think

Even though I only do it once every few years or so, making salmon gravlax at home is a fun weekend project, and with very little effort, you can produce some very impressive results. I’ve always done this with the traditional fresh dill sprigs, but after enjoying a beet-stained version at Plaj, I decided to try my hand. And, also stain my hand.

If you’re just doing a small tail piece like I did, these times and measurements should get you close to what you see here, but if you're feeling adventurous, and want to do something larger, then you may have to do some research for techniques that work better when doing a thicker piece of fish.

Those slightly more complicated methods involve turning, draining, and basting, to account for a longer curing time. So what I’m trying to say is, you can avoid all that by just doing a smaller piece, which, unless you’re hosting a large party, should be plenty. Speaking of large parties, and the litigious people that sometime attend them, please be sure to get your salmon from a reliable source.

I think a brick works great for a press, but anything that weighs a few pounds would be fine, as long as it’s large, and flat enough to distribute the weight evenly. A book with a few cans of soup on it would do the trick. Regardless of how you press yours, once unwrapped, sliced, and served on a toasted bagel, I think you’ll agree it was worth the wait. So, I really do hope you give this gravlax technique a try soon. Enjoy!


Ingredients for 6 to 10 ounces of Gravlax:
8 to 12 ounce tail section of fresh salmon with skin on (scaled)
1/4 cup kosher salt
1/4 cup white sugar
cayenne and/or freshly ground black pepper to taste
enough grated beet and/or fresh dill springs to thickly cover fish

- Press with something heavy, and let cure in fridge for 1 1/2 days, or until salmon is firm, and translucent when sliced. You can carefully unwrap, and poke to test, and then rewrap, and let cure longer if need be.

Friday, May 18, 2018

Fried Cheese Egg Toast – The Breakfast of Champions (In a Rut)

I’m not sure what your usual breakfast routine entails, but chances are you occasionally get bored with it, and crave something completely different, and when that happens, it doesn’t get much more different than this fast, and easy fried cheese egg toast. Be careful though, since afterwards it’s not easy going back to that bowl of oatmeal.

While pan-frying cheese may not sound particularly healthy, as it caramelizes, it gives up a fair amount of butter fat, which stays behind in the pan. So, you could actually spin this technique as a new, fat-reducing hack – unless you use that to butter the toast, which isn’t a dumb idea.

By the way, I hope you like your yolks runny, since if you don’t, this is not going to be nearly as great. Which reminds me, why do people not like runny yolks? What’s not to like? I hope they don’t think they’re dangerous, because they’re not. Anyway, if you are a fan of the flow, this fried cheese egg toast is the way to go, so I really do hope you give this a try soon. Enjoy!


Ingredients for one Fried Cheese Egg Toast:
1 ounce grated cheddar cheese
pinch red pepper flakes
1 large egg
1 piece of toast
sliced green onions to garnish
pinch of salt

*Note: For best results, rub your non-stick pan with a few drops of olive oil

Friday, May 11, 2018

Chocolate Granola – Take That, Count Chocula!

I know chocolate granola sort of sounds like candy, but introducing cocoa into the mix not only makes it delicious, it also actually makes it better for you! Possibly. No one is really sure. The point is this really tastes great, and would make a wonderful treat for the chocolate lover, mother or otherwise, in your life.

I showed amazing restraint not adding anything more that oatmeal and almonds, since I really think that’s the best plan for the chocolate base, but I would have no problem with you accessorizing this as you see fit. Coconut flakes are an obvious choice, as are other usual suspects like dried fruit, any and all nuts, and assorted seeds.

If you want a stickier granola, that will more easily clump together, you can up the brown sugar and maple syrup a bit, as I used the bare minimum in this recipe, but I think it’s plenty sweet enough, especially if you’re a fan of dark chocolate.

Speaking of chocolate, I used Guittard’s Cocoa Rouge, a Dutch-process cocoa, which has a lower acidity than regular cocoa, and works perfectly flavor-wise. However, I’ve heard that type of cocoa doesn’t retain as much of the nutritional value, due to the way it’s processed. The good news is, any high-quality cocoa will work here.

By the way, I was only half-kidding about making this for someone, and then keeping it all for yourself, so best play it safe, and make a double, or triple batch. No matter how much you make, or what you add in, I really hope you give this a try soon. Enjoy!


Makes about 3 1/2 cups of Chocolate Granola:
1/3 cup packed brown sugar
1/4 cup maple syrup
2 tablespoons vegetable oil
1/2 teaspoon vanilla extract
3/4 teaspoon kosher salt (or 1/2 teaspoon fine salt)
pinch of cayenne
3 tablespoons unsweetened cocoa (Dutch-processed if possible)
2 cups rolled oats
3/4 cup chopped almonds

- Mix, and bake at 250 F. for about an hour, or until as crunchy/chewy as you like.

Tuesday, May 8, 2018

Madame Cristo, I Presume

I was attempting to do a little twist on the venerable Croque Madame, by soaking the toast in a custard batter before frying, instead of topping it with the usual white sauce, but when I’d finished, I realized what I really had created was a Monte Cristo with a poached egg on top. These things will happen.

It was amazingly delicious, but I decided it wasn’t close enough to call a Croque Madame, which is when I turned to Twitter for help. This is never a good idea, but this time it totally worked out, as some dude who goes by the name, Zap Shakur (@zapshakur), suggested I go with “Madame Cristo,” and the rest is history.

If you’re just making one or two, feel free to poach your eggs right before the sandwiches are done, but for larger parties, you’ll want to check out this poached egg video, which shows a great make-ahead method for serving multiple poached eggs at the same time. This is exactly how it’s done in restaurants, where cooking to order would be virtually impossible.

If you are feeding a larger group, you can make your sandwiches ahead, and then just keep them in a warm oven, until you're ready to top with the poached eggs. But, whether you’re making this for two or twenty, I really do hope you give it a try soon. Enjoy!


Ingredients for 2 Madame Cristos:
4 slices white bread, lightly toasted
8 thin slices of Gruyere, Swiss, Cheddar, Havarti, or any other melting cheese
4 ounces thinly sliced honey baked ham or similar meat product
2 tablespoons butter for pan frying
2 poached or fried eggs to top
chives to garnish

For the egg batter:
2 large eggs
5 tablespoons heavy cream or milk
1/2 teaspoon fine salt
pinch of nutmeg and cayenne
1 teaspoon freshly grated lemon zest

Friday, April 27, 2018

Scottish Oatcakes – The Pancake, Not the Paperweight

If you Google, “Scottish Oatcakes,” you’ll see lots of pictures of what looks like thick, dense, pressed oatmeal cookies, which is the most common version of this recipe. To be honest, I’m not a huge fan of those, since they tend to be very heavy, and filling, and not really something I want to feature as the centerpiece for a fancy brunch menu.

However, there is another pancake-like version, and this is my twist on that. I should’ve probably come up with my own, more appropriate name, but I really love saying “Scottish Oatcakes,” and it just sounds like something you’d want to eat for breakfast.

Once you mix up your batter, you can cook it right away, which produces something that looks identical to what we have here, except the texture will be much more toothsome. I do enjoy that approach, but if you let the mixture sit for a while, the oats continue to soften, resulting in a creamier center. I’ve also let this go overnight, which will give you a texture very similar to actual oatmeal. 

Regardless, you’re still going to get a beautifully browned, crusty exterior; and it’s that contrast that makes this so unique. Some people like to add dried fruit to these, but I do not. The same goes for the traditional pinch of cinnamon, since I really don’t want these to taste like oatmeal raisin cookies. As usual, suit yourself, but either way, I really do hope you give these great oatmeal pancakes a try soon. Enjoy!


Ingredients for 6 Scottish Oatcakes:
(this is only 2 portions, so feel free to double or triple the recipe)
1 cups *rolled oats
1 cup heavy cream
1 teaspoon lemon zest
2 teaspoons lemon juice
1 large egg
1 teaspoon honey
1/4 teaspoon fine salt
1/4 teaspoon baking soda
1/4 cup **self-rising flour
1/4 cup melted butter for panfrying

* I used the regular kind, but if you have to use the instant ones, I probably wouldn’t cook them. I’d just mix them with the cream, and let it sit until the mixture thickened up. By the way, this is just a theory, as I’ve never attempted.

** If you don’t have self-rising flour, just add 1/4 cup of all-purpose flour, plus 1/2 teaspoon of baking powder, and an extra pinch of salt.

Tuesday, January 16, 2018

Chocolate Croissants – But Just Barely

I’ll admit to being pretty underwhelmed the first time I had a chocolate croissant, or “pain au chocolat,”as I’d mispronounce it; but eventually I realized the relatively sparse amount of chocolate wasn’t any kind of stinginess, but rather the true secret behind this amazing pastry.

Properly done, this should ride that line between sweet pastry and a savory bread, so don’t overdo it with the chocolate chunks; otherwise you’ll lose that beautiful balance. Other than that, not much can go wrong. Just be sure to bake them until nicely browned, and let them cool before enjoying.

While this will work with that dough in the tube, I’d like to think you’d make a batch of your own dough using our recently posted croissant recipe. Don’t worry, it only seems like a lot of work. Either way, I really do hope you give these chocolate croissants a try soon. Enjoy!


Ingredients for 12 Chocolate Croissants:
1 batch of croissant dough from this recipe (split in half for two batches of 6)
about 1 cup roughly chopped chocolate chunks, or chips
1 large egg, plus 1 tablespoon of water for the egg wash
coarsely ground sea salt
- Bake at 400 F. for about 20-25 minutes, or until well-browned

Tuesday, January 9, 2018

The Denver Omelet – Denver, Colorado, Not Denver, France

This Denver omelet was one of the first things I learned how to make professionally, during my brief, but exciting career as a short order cook in high school. So, it was a little disconcerting to learn when I arrived at culinary school that everything I had done was totally wrong.

According to the chefs teaching me how to make a classic French omelet, my Denver omelet was overcooked, over-browned, and included too many ingredients.  It was made very clear that if I made that for my exam, I would fail, which was confusing since I thought they were really good, and the people at the diner where I’d worked seemed to agree.

Over the years, I’ve come to appreciate both styles of omelet, and understand they really are two entirely different things. I’m not sure exactly why, but I seem to prefer the softer French version for breakfast, and this heartier American-style for lunch, or dinner. Maybe it’s the browning, or denser texture, but it really does make for a great “can’t figure out what to have for dinner” idea.

As with all omelets, feel free to toss in anything you want, but just be sure to cook it long enough before adding the eggs.  To me there’s nothing worse than an omelet with crunchy, undercooked vegetables in it, and that’s really the only way to screw this up. But, no matter what you use, or when you enjoy this, I really do hope you give this a try soon. Enjoy!


Ingredients for one Denver omelet:
1 tablespoon butter
3 large eggs
1/3 cup grated cheddar cheese
1/4 cup diced smoked ham
2 tablespoon finely diced onion
2 tablespoon finely green bell pepper
salt and freshly ground black pepper to taste
pinch of cayenne

Tuesday, January 2, 2018

Ben Franklin Breakfast Bowl – One Founding Father’s Alternative to Fast Food

I much prefer teaching to preaching, but this time I’m attempting to do both, with the hope that you might introduce this delicious breakfast bowl into your morning routine. I’m not sure if an apple a day really does keep the doctor away, but I do know that being in the drive-thru line every morning, doesn’t.

We’ve all heard that breakfast is the most important meal of the day, which may or may not be true, but I’ve always found it to be the most difficult meal of the day.  There never seems to be enough time, and so it’s easy to get into a rut, resorting to questionable choices such as sugary cereal and milk, or fast-food breakfast sandwiches.

As far as specific ingredient choices go, I like to use chilled Honey Crisp, or Fuji apples, and, as I mentioned in the clip, sheep’s milk is my preferred yogurt. Some say it’s easier to digest, and it contains higher amounts of linoleic acid, which apparently helps with fat loss, but I simply prefer the taste. Just be sure to use a plain yogurt, since many flavored varieties contain a shocking amount of sugar.

So, whether you try this to help with that New Year’s resolution, or you’re just looking to add some variety into the morning routine, I really do hope you give this Ben Franklin breakfast bowl a try soon. Enjoy!


Ingredients for one portion:
1 cold, raw apple, cubed
6 ounces plain sheep’s milk yogurt
2 heaping tablespoons granola (click here for our recipe)
chopped nuts and/or additional seasonal fruit to garnish

Friday, October 6, 2017

Canelés de Bordeaux (Crispy Baked French Custards) – Hold the Mold!

I’ve wanted to do a Canelés de Bordeaux video forever, but just never got around to buying the specially designed molds that they require. After seeing a picture of them online a few days ago, I decided this would be the week, and headed out to the one store near me I knew carried the necessary hardware.

Since it was actually a hardware store that also carries lots of kitchen equipment, I figured they would have the beeswax, as well. I’ve been in that store at least a hundred times, and I would anyways see the canelé molds beckoning me, but never pulled trigger, since I was usually looking for something else.

So, you can imagine my shock when I walked down that aisle, as I’d done so many times before, only to find they were no longer stocked. Thanks a lot, Amazon. Anyway, purely out of spite, I decided to make them anyway, using a regular muffin pan, and the results were pretty amazing.

As long as you cook them long enough, the muffin tin works great, assuming you don’t care about getting the classic shape. Since this was an experiment, I only did six, but I’ve scaled the recipe below to make 12. I’m not sure how many real canelé molds this recipe will fill, but it’s probably close to that. Either way, I really hope you give these a try soon. Enjoy!


Ingredients for 12 Canelé de Bordeaux:
2 cups whole milk
2 tablespoons plus one teaspoon unsalted butter
1 cup white granulated sugar
1 cup all-purpose flour
4 egg yolks
1/4 teaspoon kosher salt, or 1/8 teaspoon of fine salt
1 teaspoon vanilla extract
1/4 cup rum

For greasing pan:
2 tablespoons butter
2 tablespoons beeswax

- Bake at 450 F. for 10 minutes, then at 375 F. for about 50 minutes more, or until well browned.

-- NOTE: These only stay crispy for about 8 hours. So, fair warning if you plan to make them a day ahead. I've never tried to re-crisp.