Showing posts with label Beef. Show all posts

Friday, March 15, 2019

Coney Island Knishes – St. Patrick’s Day Leftovers Edition

One of my earliest “exotic” food experiences was eating potato knishes with my Dad when we’d visit Coney Island. There were the square variety, and we’d buy them from a hot dog cart, and since potatoes were my favorite food growing up, I was in heaven. I mean, mashed potatoes in a warm, flaky pastry? I’ll have two, please.

Back then they were still made with copious amounts of chicken fat, also know as “schmaltz,” which was the real secret behind their awesomeness, but you can make a perfectly fine version without that, especially if you have some leftover corned beef around. Regardless of how you fill these, the technique seen herein will work, and half the fun is trying new versions. As long as the base is mashed potato, spiked with onions fried in lots of fat, anything goes.

I think the baked version is the easiest, but if you feel so inclined, these can also be deep-fried, or pan-fried. No matter how you cook them, one of the keys is getting the dough nice and thin, so your finished product is mostly filling. Other than that, these are relatively simple to make, and the kind of snack that fills more than just an empty stomach, which is why I really hope you give these a try soon. Enjoy!


Ingredients for 16 Knishes:
(Please Note: I only used half the dough in the video, and only made enough filling for 8 knishes, but the following ingredients will make 16 total)

For the dough:
2 3/4 cups all-purpose flour, plus more as needed
1 teaspoon kosher salt (or 1/2 teaspoon fine salt)
1 teaspoon baking powder
1 large egg, beaten
1 teaspoon white vinegar
1/2 cup canola oil
1/2 cup warm water

For the filling (might make extra):
2 1/2 pounds russet potatoes, peeled, quartered, and boiled in salted water until tender
1/2 cup melted butter, and/or rendered chicken fat
2 cups diced yellow onion
2 teaspoons kosher salt (or 1 teaspoon fine salt), plus more to taste
freshly ground black pepper and cayenne to taste
8 ounces diced corned beef
1 cup finely chopped cooked cabbage

- Bake at 375 F. for about 40 minutes, or until golden-brown
-->

Tuesday, February 26, 2019

Mississippi Beef Short Ribs – Based on an Amazing Recipe I’ve Never Had

I usually make a recipe before trying to adapt it, but that didn’t happen with this Mississippi beef short ribs recipe, which is based on the viral sensation, Mississippi pot roast. In the original, the beef is braised in a slow-cooker with butter, pepperoncini, and packets of powdered au jus gravy, and powdered ranch dressing. I really wanted to try it, but I was afraid someone at the store would recognize me buying those last two ingredients.

Anyway, people were losing their minds over how delicious it was, and while I figured most of that was due to the copious amounts of MSG in the gravy, and dressing mixes, I was fascinated by the strange combination of ingredients, and decided to give it a whirl with some boneless short ribs.  I’m so glad I did, as this really did come out amazingly well.

The original recipe calls for a few whole pepperoncini to be scattered over the top, which in hindsight, probably would have worked out better. I used a ton of sliced peppers, and their intense briny taste almost made this seem too salty. So, like I said in the video, if you do use the sliced ones, be careful not to overdo it. 

The pieces of “short rib” I used, which are actually just neatly cut pieces of super-marbled chuck, where nice and thick, which means if yours aren’t, you’ll have to adjust the cooking time. As usual, we don’t want to go by time anyway, and simply keep cooking until they are fork tender. But, no matter the size or shape of your beef, I really do hope you give this a try soon. Enjoy!


Ingredients for 6 Portions:
For the seasoning mix:
1 teaspoon kosher salt
1 teaspoon freshly ground black pepper
1 teaspoon garlic powder
1 teaspoon onion powder
1 teaspoon dried dill
1/2 teaspoon dried rosemary
1/2 teaspoon dried thyme
2 tablespoon finely grated Parmigiano-Reggiano
For the rest:
1 tablespoon olive oil
salt, freshly ground black pepper, and to taste
2 1/2 pounds boneless beef short ribs
1 large onion, sliced
handful sliced mushrooms
1 tablespoon all-purpose flour
2/3 cup chicken broth
1 tablespoon soy sauce
1/2 teaspoon Worcestershire sauce
6 whole pepperoncini peppers (or 1/3 cup of sliced like I used)
1/4 cup unsalted butter

- Roast covered at 350 F. for about 2 1/2 hours, or until tender.
-->

Friday, January 18, 2019

Beef Rendang and the Case of the Invisible Sauce

Don’t think of this amazing Indonesian beef curry as not having a sauce, think of it as not needing a sauce. By the way, it has a sauce – you just can’t see it. Flavorless water evaporates when you reduce a pan sauce, like we’re doing here, but fat doesn’t, nor does flavor, which is what makes this such a unique, and deliciously addictive dish.

Originally the recipe was developed as a way to preserve meat in hot and humid Indonesia, which is why it was cooked until dry. The lack of moisture, along with all these naturally antimicrobial ingredients meant you could keep this around for weeks without it spoiling, and apparently people enjoyed the taste and texture so much, they continued making it this way long after refrigeration was available.

Having said that, if you do want some sauce to serve with it, simply add more water during the cooking, or cover for part of the time, and you’ll be all set. Which reminds me, if you do cook this the day before, as recommended, you’ll want to add a big splash the water to the pan when you reheat it. Add some water, cover it, and when you think it’s heated through, uncover, crank the heat, and cook until it reaches your desired degree of dryness.

The ingredient list below does contain a few semi-exotic items, so I’ve added what to substitute with in parentheses, but all in all most of these things should not be that hard to find, especially online. But whether you make a few substitutions or not, I really do hope you give this intensely flavorful, and invisibly-sauced beef rendang a try soon. Enjoy!


Ingredients for 4 large portions Beef Rendang:
4 shallots, sliced (or red onion)
6 garlic cloves
1.5 inch piece fresh ginger, peeled, sliced
1.5 inch piece galangal (or ginger)
1 Fresno red chili pepper
2 Serrano chili pepper
1 tablespoon kosher salt, plus more to taste
1 or 2 tablespoons red chili flakes, depending on desired heat
1 teaspoon ground coriander
1/2 teaspoon ground turmeric
1/8 teaspoon ground cardamom
1/8 teaspoon nutmeg
2 tablespoons vegetable oil
2 1/2 pounds beef chuck, cut in 2-inch pieces
1/2 stalk lemongrass, lighter part, bruised with back of knife
1 can coconut milk
1 generous tablespoon brown sugar
2 teaspoons tamarind paste (or zest from a lime and lemon, plus juice from 1 lime)
steamed rice for service, garnished with cilantro and lime if desired
-->

Wednesday, January 2, 2019

Meatball-Stuffed Garlic Bread Sliders – A Hole Lot of Awesome

I’ve wanted to do a video for baked cheeseburger sliders for a while now, but I’ve also been craving a meatball sub, so long story short, this is what I ended up with, and they were amazing. Above and beyond some decent ingredients, the real secret to these beauties is placing the meatball in through the top of the roll, versus splitting and stuffing in the traditional manner.

I can’t explain exactly why, but there’s something very special about these, and they really were a lot of fun to eat. Maybe it ‘s the symmetry, or center of gravity, but they just feel right in your hand. I’m not sure who invented this technique, but I first saw it on a blog called, Cooking for Keeps, so they get the credit for now.

Like I mention in the video, this easy procedure would lend itself to all kinds of variations, and I expect to see some great ones shared on social media soon. We’re getting close to the Super Bowl, and like I said before, it’s not about who wins the trophy, but rather who wins the snack table, and if you show up with these, that will be you. So, I really do hope you give these meatballs-stuffed garlic bread sliders a try soon. Enjoy!


Ingredients for 18 Meatball-Stuffed Garlic Bread Sliders:
18 dinner rolls (I used Hawaiian rolls, but will try regular less-sweet ones next time)
3 tablespoons butter infused with 3 or 4 cloves of crushed or minced garlic
1 pound grass-fed beef
1 diced yellow onion and a few cloves of garlic sautéed until soft in olive oil
2 tablespoons freshly chopped parsley, plus more for garnish
1 large egg
1/4 cup plain breadcrumbs
1 cup grated fontina cheese, divided (big handful in the meatball mix, and the rest on top)
2 teaspoons kosher salt
freshly ground black pepper and cayenne to taste
2 cups prepared tomato sauce
freshly grated Parmigiano-Reggiano cheese for the top
-->

Friday, August 24, 2018

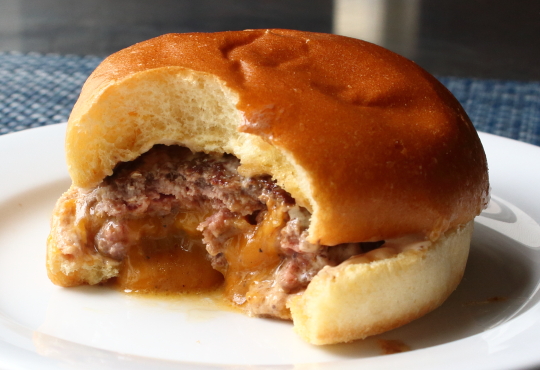
Juicy Lucy – So Jucy

No, that’s not a typo. Depending on whom you talk to, this cheese-stuffed burger is either called a “Juicy Lucy,” or a “Jucy Lucy.” That’s because two restaurants in Minneapolis claim to have invented it, and they spell it differently. The 5-8 Club goes with “Juicy,” while Matt's Bar saves a character and spells it, “Jucy.” Unless you end up on some kind of cheeseburger related trivia show, this is probably useless information, but hey, you never know. 

By the way, I’m not picking sides, but went with “Juicy,” simply to appease my spell-checker. No matter how you spell it, one thing is for sure; this isn’t just any old cheeseburger.

The cheese stuffing really does keep the meat juicier, and the mouthfeel is noticeably different that what you experience with a burger that has cheese melted over the top. However, for this to work you need to keep the cheese inside, which means making sure you thoroughly and thoughtfully press the edges of the two patties together.

Please note that the times I gave in the video may, or may not, be close to what you’ll need. There are so many variables such as fat content, meat temperature, pan temperature, cheese choice, and portion size, just to name a few. So, doing some testing before the big burger party is recommended. Best homework, ever! Above and beyond that, not much can go wrong, so I really do hope you give this a try soon. Enjoy!

Tuesday, July 24, 2018

Poutine – You'll Ruin French Fries and Like It

As the old joke goes, it takes a lot of time and effort to make poutine, but at least when you’re finally done you get to eat soggy fries. And, what incredibly delicious, soggy fries they are. 

Once you get past the fact that this is how they’re supposed to be, you can focus on the overall awesomeness of the dish, especially the rich, freshly made beef gravy featured herein.

I realize most you won’t actually use this gravy to make poutine, which is totally fine by me, since this is so good, on so many other things. While I don’t have any problem with you buying the cheese curds, or using frozen fries, I really do hope you make the sauce from scratch, as it is profoundly better than anything from the store.

I should mention that none of the “authentic” poutines I’ve had included chunks of beef in the gravy, but I really enjoy the extra meatiness, and this way everyone knows we made it from scratch. By the way, if you’re of the vegetarian persuasion, some severely caramelized mushrooms, and a decent vegetable stock (which I still need to do a video for), will produce a perfectly fine version. Either way, I really do hope you give this a try soon…at least the beef gravy. Enjoy!


For the Beef Gravy:
1 tablespoon vegetable oil or lard
1 to 1 1/2 pounds boneless beef short rib, chuck, or brisket, chopped
4 tablespoons butter
1 cup diced onions (you can also add some garlic if you want)
salt, freshly ground black pepper, and cayenne to taste
1/3 cup all-purpose flour
4 cups homemade beef broth, or a low-sodium, all-natural prepared broth
fresh chives to garnish

For the Fries: click here for video

For the Cheese Curds: click here for video

Tuesday, June 12, 2018

Bourbon Pepper Pan Sauce – Learning a Skill That Always Thrills

Mastering pan sauces is one the easiest things a home cook can do to raise their culinary game, since it allows one to produce dishes most people only see in restaurants. And not just any restaurants. The really good ones.

By the way, if you’re still looking for a Father’s Day gift, a nice bottle of bourbon, with a little splash going to finish a home-cooked steak, would make quite the one-two punch of manly goodness. And, even if your dad isn’t a sitcom stereotype, who doesn’t enjoy a well-executed pan sauce?

If you’re making this for meat that’s coming off a grill, you can still do the sauce separately, and just keep it warm until the main course is ready. Start with the sautéing garlic in butter step, and finish as shown. Of course, you’ll have to add some coarsely ground black pepper to the sauce, but that’s about the only adjustment.

Like I said in the video, this sauce’s rich, sweet, peppery flavor profile also works wonderfully with pork chops, and grilled chicken. You can also switch up the Bourbon for another liquor, since this really is just a technique video. Regardless of what you use, or what you serve it with, I really do hope you give this great pan sauce a try soon. Enjoy!


Ingredients for two portions:
1 clove minced garlic, sautéed in 1 teaspoon butter
1 ounce bourbon
1/2 cup chicken broth or veal stock
1/3 cup heavy cream
2 teaspoons cold butter
salt and cayenne to taste
freshly ground black pepper to taste

Friday, May 25, 2018

Grilled Root Beer Beef – Almost as Good as an Ice Cream Float

I’ve used something very close to this root beer marinade for lamb several times, and had great success, so I’ve been eager to try it with some skewered beef, which didn’t come out quite as well, but could have. Please, let me explain.

Since lamb has a stronger, “gamier” taste, the sweetness of this treatment works perfectly, but I thought it was a little too much for the beef. So, below in the ingredients list, I've made a few adjustments to the honey amount, as well as acidity level.

The beauty of a recipe like this is they’re very easy to adapt, and I’m not just talking about the pre-grill soak, but also the glaze we make with the extra marinade. Once reduced to something thick enough to coat our meat, you’ll want to taste it, and adjust with more heat, sweet, sour, or whatever else you think it needs. One thing mine definitely needed was more salt. I thought the soy was going to be enough, but I should have salted my skewers before they hit the grill, and/or add some salt to the marinade.

Adjustments aside, if you enjoy things like sweet/hot barbecue sauces, bourdon glazes, or even something like teriyaki, you will probably very much enjoy this. Even if you don’t use the marinade, I really loved the technique we used for the flank, which would work beautifully no matter how you flavor this. Either way, I really hope you give this a try soon. Enjoy!


Ingredients for 4 skewers/portions:
1 whole flank steak (about 1 1/2 pounds)
For the marinade
1 tablespoon vegetable oil
1 teaspoon freshly ground black pepper
1 teaspoon cayenne
1/2 teaspoon ground chipotle pepper
2 tablespoons ketchup
honey, optional (I used 2 tablespoons, but would omit next time)
1/3 cup soy sauce
2 tablespoons white or cider vinegar (I didn't add, but it needed it)
1 bottle (12 ounces) good quality root beer
kosher salt to season skewers generously

Tuesday, May 15, 2018

Barbarian Beef – Our Oldest Recipe Yet

Ever since I saw Alton Brown grilling skirt steak on hot coals, I’ve wanted to try this technique for a larger hunk of meat, but it was the realization that no one had yet called a recipe “barbarian beef,” that provided the final push. 

By the way, I did no historical research, but I assume your average barbarian was too busy pillaging to lug a grill around, and just cooked their meat right on the coals. So, for the purposes of this post, that's the story we'll be going with.

I used top round for this, and if you’re just going to slice it thin, and make sandwiches it’s fine, but now that I have a little experience, I’d like to try it with a tenderer cut. No matter what you use, you’ll want to take it off a few degrees under whatever your regular internal temp target is, since it definitely continues to cook after you take it off the coals.

It’ll depend on the size/shape of your cut, but use a thermometer to check, as the temp will probably climb by at least 10 degrees. Above and beyond doneness, the flavor of the beef really was great. Very similar to something off a grill, but with a little bit deeper level of smokiness. Even if you don’t cook your steak on the coals, the sauce was quite nice, and comes highly recommended, but officially, I really do hope you give both a try soon. Enjoy!


For the Sauce:
4 cloves garlic
1 Fresno chili pepper, or other fresh hot pepper
2 teaspoons rosemary leaves
1 teaspoon kosher salt
2 tablespoons wine vinegar
2 tablespoons olive oil

Friday, March 16, 2018

Corned Beef & Kimchi Fried Rice – Just Like Your Irish-American-Korean Grandmother Used to Make

After too many requests to count, I’m finally posting my recipe for kimchi fried rice, and by “my recipe,” I mean everyone’s recipe, since give or take a handful of meat, they’re all pretty much the same. 

Having said that, I’ll give a shout out to the lovely and talented, Maanchi, since I checked her channel to make sure I wasn’t missing any key elements, as well as learn how to say, “gochujang.”

I’m not sure how close I got to the later, but except for the seaweed, I did get all the ingredients right. Of course, the diced corned beef is optional, but if you do have some leftover from your St. Patrick’s Day, I highly recommend you give it a try. Bacon is another fine choice, as is almost any other diced meat I can think of.

The egg is also technically optional, but not for me. The way the runny yolk mixes into, and moistens the rice takes this to a whole other level. The poached egg also paired quite nicely with my “landweed” garnish, as it does with the much more traditional shredded seaweed. But, no matter how you accessorize, I really hope you give this corned beef and kimchi fried rice a try soon. Enjoy!


Ingredients for 2 large portions:
1 generous cup chopped drained kimchi
2 tablespoons vegetable oil
1 1/2 cups diced corned beef or other meat
3 generous cooked rice, (I find cold works best for crustification)
1/4 cup kimchi juice
1/4 cup water
2 tablespoons gochujang chili paste
1/2 cup sliced green onion
2 teaspoons toasted sesame seeds
2 teaspoons sesame oil, or to taste
2 poached or fried eggs
shredded seaweed to garnish, optional

Friday, March 9, 2018

Kimchi Corned Beef – Adding Some Seoul to St. Patrick’s Day

I’ve always loved St. Patrick’s Day, since apparently that’s the only day of the year I get to eat corned beef and cabbage. Besides the copious amounts of salt, nitrates, and fat, I have no idea way we’re not eating this stuff a couple times a week. Anyway, because this is usually an annual thing, most folks make it the same way, year after year, but that’s never been my M.O. I like to think of ways to creatively tweak the recipe, so that while I’m enjoying my new creation, I can think about how much I’d wished I just boiled it in water, with that little packet. 

What I’m trying to say is, not every attempt has been a homerun. Or whatever a homerun in Irish hurling is. This, however, was a success. The spicy, fermented cabbage, added a lot of extra savoriness, and not only to the meat, but even more so to the vegetables.  The potatoes especially soaked up a surprising amount of flavor, and may have been my favorite part of the whole dish.

I used a corned beef made from the round, instead of the traditional brisket, which worked out much better than I thought it would. If you do decide to go this lower fat option, be sure not to cook it too long. The fork should pierce the meat without too much force, but we do not want to meat falling apart, as it will become dry and chalky. Chances are you’re going to use a brisket anyway, which is much more forgiving, but something to keep in mind if you do go with the round. Either way, I really do hope you give this a try soon. Enjoy!


Ingredients for 6 portions:
1 ready to cook corned beef (mine was about 3 1/2 pounds)
4 cups kimchi, not drained
1 cup cold water or as needed
2 pounds Yukon Gold potatoes, quartered
3 large carrots, cut in large chunks
2 ribs celery, cut in large chunks
green onions to garnish

Tuesday, March 6, 2018

Beef Pirozhki – Russia, Russia, Russia!

Like most well informed, non-crazy Americans, I’m waiting for Russia to get their just desserts for interfering with our democracy; but, before we get to dessert, we need to have dinner, and that’s where these delicious beef pirozhki come in.

While not necessarily easy to make, the dough and filling are pretty simple, and the results well worth the trouble. Literally any filling will work here, but I was going for a very specific style of pirozhki, which I’ll describe as “mid-eighties, liquor store deli.” Allow me to explain.

I once worked as a bike messenger for like two days. After realizing how grueling it was, especially in hilly San Francisco, I spent my life savings ($120) to buy a friend’s scooter, which extended my career by a full 6 months. The money wasn’t great, and so for lunch I’d get a beef pirozhki from one of those sketchy delis you sometimes see in the back of big city corner stores.

They only cost two bucks, delivered a ridiculously high number of calories, and even though I knew it wasn’t the healthiest thing to eat, I grew to love the taste. So, when I decided to film this, I set out to get as close to that experience as possible. It took a few tries, but I ended up with something very similar. The only major difference is that I know for sure what meat was used.

Since you’re not trying to recapture a taste from your past, feel free to add more cheese to the filling, which will not only taste good, but also make the crumbly filling easier to work with. But, no matter what you stuff these with, I really do hope you give them a try soon. Enjoy!


Ingredients for about 15 Pirozhki, depending on the size:

For the beef filling:
1 tablespoon olive oil
1 tablespoon butter
1 large onion, finely diced
2 pound ground beef
2 teaspoons kosher salt, plus more to taste
1/2 teaspoon freshly ground black pepper
4 cloves garlic, minced
2 teaspoons dried dill

1/3 cup chicken broth or water to deglaze
1/4 cup grated sharp cheddar cheese, optional
2 tablespoons Parmesan cheese, optional

For the dough:
1 scant cup warm milk (just under a cup of milk heated to about 100 F.)
1 package active dry yeast (2 1/4 teaspoon)
2 teaspoons white sugar
1 teaspoon kosher salt
1 large egg
2 tablespoons melted butter
about 3 cups all-purpose flour, or as needed

NOTE: I’m not sure the amount of filling will match the amount of dough, but if you have extra of either, both can be frozen until next time.

Friday, January 26, 2018

Philly Cheese Steak Dip – Fly Eagles, Fly

I was going to say this Eagles-inspired cheese steak dip would be great to serve at your Super Bowl party, but I just remembered we’re not allowed to use the term “Super Bowl” anymore, since that’s aggressively protected by the National Football League’s lawyers. So, instead of saying, Super Bowl, again, I’ll just say “Big Game.”

Regardless of what’s printed on your invitations, this easy to make hot dip would make a handsome addition to your snack table. Like all great party foods, it’s wonderful hot, warm, room temp, and, I’ve heard from a reliable source, even delicious cold. By the way, never print invitations to your Big Game party.

As I mentioned in the video, there are several approaches for preparing the steak in this. You can chop it up raw, and then brown it, or brown pieces of steak, and then chop it up, as we did here, or, if you really want to save some time, you could brown up some ground beef, which should also work pretty well in this.

For a vegetarian version, you could do this with well-browned mushrooms, which I’m guessing would be very tasty. I’ll never know for sure. Anyway, stay tuned for some kind of party food celebrating the other city in this contest, but in the meantime I really do hope you give this Philly cheese steak dip a try soon. Enjoy!


Ingredients for 24 portions of Philly Cheese Steak Dip:
1 pound top sirloin steak, cut into inch thick slices (any beef should work)
salt and freshly ground black pepper to taste
1 tablespoon olive oil
1 yellow onion, diced
1 tablespoon butter
1 1/2 to 2 cups diced peppers (use a mix of sweet, hot, and/or pickled peppers)
1 pound cream cheese, softened
8 ounces shredded provolone cheese
1/2 teaspoon Worcestershire sauce
touch of cayenne
- sliced baguette to serve alongside

Friday, December 8, 2017

Tourtière – A Meaty Holiday Main Course That’s Easy as Pie

Many holiday main course recipes involve expensive ingredients, and/or time consuming, complicated techniques, not to mention the anxiety that comes along with worrying whether all that time and money will have been worth it. I’m looking at you, dry, overcooked beef wellington.

If you want to avoid all that, maybe consider making tourtière. This French-Canadian meat pie is hearty, satisfying, easy to make, visually impressive, relatively affordable, and since it’s best served at room temperature, doesn’t require any kind of precise timing.

You can also easily tailor this to your own tastes, since other than the ground meat and mashed potato, pretty much anything goes. Or, make it just like this. I’ve only had tourtière a handful of times, so I’m certainly no expert, but I thought this came out extremely well, and I wouldn’t change anything when I make it again.

Although, I may try it with some beef gravy, as a few of my Canadian friends have suggested. Some even suggest ketchup, which I did try on a cold slice, and not surprisingly it was delicious. But, no matter how you serve this tourtière, I really do hope you give it a try soon. Enjoy!


Ingredients for one 9-inch Tourtière:

For the crust:
3 cups all-purpose flour
1 teaspoon kosher salt
1 cup (2 sticks) unsalted butter, sliced, frozen
7 tablespoons ice cold *water
2 teaspoons white distilled vinegar
*add a little more if dough isn’t pressing together

1 large russet potato, boiled in enough salted water to cover (reserve water)

1 tablespoon butter
4 cloves garlic, crushed
1 large onion, finely chopped
1/2 cup finely diced celery
1 pound ground pork
1 pound ground beef
1 cup potato water, plus more as needed

For the spice blend:
2 teaspoons kosher salt
1 teaspoon freshly ground black pepper
1 teaspoon dried thyme
1/2 teaspoon dried sage
1/2 teaspoon ground cinnamon
1⁄2 teaspoon  ground ginger
1⁄4 teaspoon ground nutmeg
1/4 teaspoon ground allspice
1/4 teaspoon ground mustard
1/8 teaspoon ground clove
pinch cayenne

For the egg wash:
1 large egg
1 tablespoon water

Please note: Once your filling has cooled, taste for salt, and adjust before filling the crust.

- Bake at 375 F. for 1 hour, or until browned