Showing posts with label Asian Cuisine. Show all posts

Friday, February 15, 2019

Garlic Noodles – Roasted Garlic Crab Sold Separately

These deceptively simple, yet devastatingly delicious garlic noodles were invented in San Francisco, at a restaurant called, Thanh Long, back in the 70’s. Usually served with roasted Dungeness crab, the actual recipe is a very closely guarded family secret, but after lots of investigation, and even more experimentation, I think this is very close, at least for a non-MSG laced version.

Apparently, one of their “secret” ingredients is something called, Maggi Seasoning Sauce, which I decided not to use, since I’m not sure how easy it is for the average person to find. Besides, I think my assortment of savory, umami-rich substitutes did the job quite nicely, and everything in the ingredient list can be found at any large grocery store.

The most exotic thing here would be the oyster sauce, which is sort of a very savory, slightly sweet, thick, soy sauce-like condiment. And yes, it does have oyster extracts in it, in case that matters. If you can’t find it, just add a touch more fish sauce, soy, and Worcestershire, as well as little brown sugar.

Most garlic noodles actually call for sugar in the recipe, but I think that makes it too sweet for my taste, since the oyster sauce is fairly sweet, as is all that sautéed garlic. Regardless, whether you enjoy this with some roasted garlic crab, or as is, I really do hope you give it a try soon. Enjoy!


Ingredients for 2 small portions Garlic Noodles:
PLEASE NOTE: The saltiness of the following ingredients can vary, as can how sensitive people are to the taste of salt, so you may need to increase or decrease the amounts below. 
For the secret sauce:
1 1/2 tablespoons soy sauce
1 tablespoon oyster sauce
1 1/2 teaspoons Worcestershire sauce
1 teaspoon Asian fish sauce
1/4 teaspoon sesame oil
pinch of cayenne pepper
For the rest:
6 ounces dry egg noodles
4 tablespoons unsalted butter
8 cloves finely minced garlic
1/4 cup finely grated Parmigiano-Reggiano
thinly sliced green onion to garnish
red chili flakes to taste
-->

Friday, January 18, 2019

Beef Rendang and the Case of the Invisible Sauce

Don’t think of this amazing Indonesian beef curry as not having a sauce, think of it as not needing a sauce. By the way, it has a sauce – you just can’t see it. Flavorless water evaporates when you reduce a pan sauce, like we’re doing here, but fat doesn’t, nor does flavor, which is what makes this such a unique, and deliciously addictive dish.

Originally the recipe was developed as a way to preserve meat in hot and humid Indonesia, which is why it was cooked until dry. The lack of moisture, along with all these naturally antimicrobial ingredients meant you could keep this around for weeks without it spoiling, and apparently people enjoyed the taste and texture so much, they continued making it this way long after refrigeration was available.

Having said that, if you do want some sauce to serve with it, simply add more water during the cooking, or cover for part of the time, and you’ll be all set. Which reminds me, if you do cook this the day before, as recommended, you’ll want to add a big splash the water to the pan when you reheat it. Add some water, cover it, and when you think it’s heated through, uncover, crank the heat, and cook until it reaches your desired degree of dryness.

The ingredient list below does contain a few semi-exotic items, so I’ve added what to substitute with in parentheses, but all in all most of these things should not be that hard to find, especially online. But whether you make a few substitutions or not, I really do hope you give this intensely flavorful, and invisibly-sauced beef rendang a try soon. Enjoy!


Ingredients for 4 large portions Beef Rendang:
4 shallots, sliced (or red onion)
6 garlic cloves
1.5 inch piece fresh ginger, peeled, sliced
1.5 inch piece galangal (or ginger)
1 Fresno red chili pepper
2 Serrano chili pepper
1 tablespoon kosher salt, plus more to taste
1 or 2 tablespoons red chili flakes, depending on desired heat
1 teaspoon ground coriander
1/2 teaspoon ground turmeric
1/8 teaspoon ground cardamom
1/8 teaspoon nutmeg
2 tablespoons vegetable oil
2 1/2 pounds beef chuck, cut in 2-inch pieces
1/2 stalk lemongrass, lighter part, bruised with back of knife
1 can coconut milk
1 generous tablespoon brown sugar
2 teaspoons tamarind paste (or zest from a lime and lemon, plus juice from 1 lime)
steamed rice for service, garnished with cilantro and lime if desired
-->

Tuesday, January 15, 2019

Folded Pork Cutlets – Layers of Flavor, Literally

I thought I’d seen all there was to see when it came to pan-fried pork cutlets, but then I saw something called Katsu “Mille-Feuille,” and I realized I hadn’t seen anything yet. Okay, I’m being a little dramatic, but I really loved the unusual look and feel, as well as the internal flavoring opportunities the multi-layer technique provides.

Besides figuring out what to flavor yours with, the other main challenge is deciding how long to cook them. The 4 to 5 minute time I gave is just a guess, since it depends on the thickness of, and fillings in, your cutlet. Although the folding and cheese inside will help keep things moist, pork tenderloin can dry out, so I don’t recommend going past 145 F. internal temp.

However, the problem with testing by poking it with a thermometer is that you’ll have hot juices spurting out, which would be a shame. This is why I like to go with the poke test, and when it springs back enthusiastically, it’s usually done. Also, a few minutes of resting time will help even out the heat, and moisture, but by the time you add your sides, and get to the table, you should be fine.

As I mentioned in the video, this method screams for personalization, and I look forward to seeing what you come up with. Whatever that may be, I really do hope you give it a try soon. Enjoy!


Ingredients for 2 Portions:
1 trimmed pork tenderloin, split in half lengthwise
salt, freshly ground black pepper, and cayenne to taste
4 teaspoons Dijon mustard
2 ounces grated cheese, or as needed
2 tablespoons freshly chopped Italian parsley
For the breading:
enough all-purpose flour to coat
beaten egg
panko, or regular plain breadcrumbs
olive oil for frying (at least 1/4 inch of oil in the pan is recommended)
-->

Tuesday, December 4, 2018

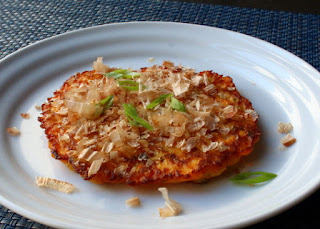
Kimchi Pancakes – Come for the Savory Pancake, Stay for the Dancing Fish Flakes

I remember getting a request for kimchi pancakes many years ago, and while I recall being intrigued, apparently not enough to actually research the recipe, and do a video for it. That all changed after seeing it on a local bar menu, where Michele and I enjoyed not one, but two orders of these incredibly tasty, and visually thrilling, savory pancakes.

I loved the taste and texture, but what really got my attention were the dancing bonito flakes on top. I’d never seen anything quite like that, and found it as mesmerizing, as I did delicious. As I mentioned in the video, those kimchi pancakes came with a little drizzle of spicy mayonnaise, which depending on how decadent of an experience you’re going for, isn’t a bad idea, especially if you plan on frying these up, and cutting them in wedges to serve as a snack at a party.

If you want a thicker, and more substantial kimchi pancake, you want to use less liquid, or more flour, so that your batter isn't quite as runny as mine. Personally, I enjoy this style a little more, since you end up with a thinner pancake that’s crispy around the edges, but still moist and tender inside. Having said that, you should definitely experiment with different textures to see what you like best.

These are also a perfect catchall for leftover meat and vegetables. Just chop it up, toss it in, and see what happens. Speaking of seeing what happens, if you want to watch fish flakes dance, you’ll have to find some bonito, which means finding an Asian market, or buying them online, and I highly recommend you do just that. Either way, I really do hope you give these a try soon. Enjoy!


Ingredients for 4 Appetizer Size Kimchi Pancakes:
1 1/2 cup chopped drained kimchi (12 ounce jar)
1 large egg
3 tablespoons kimchi juice
1/4 cup water
1 teaspoon brown sugar
1/2 teaspoon salt
1/2 teaspoon sesame oil
1/2 cup thinly sliced green onions
about 3/4 cup all purpose flour, or as needed
4 tablespoons bonito flakes for the top, optional
-->

Friday, August 10, 2018

Spicy Pork & Vegetable Tofu – Probably Not Mapo Tofu

This might look like I was trying to make a version of a famous Chinese dish called mapo tofu, but that's not the case, and in fact, I'm pretty sure I was making this before I knew what mapo tofu was. And now that I’ve addressed the people that were going to complain this isn’t authentic, we can continue.

I'm assuming that whatever I did get this idea from was most likely a version of mapo, but that's as far as it goes. Which reminds me, this is a great recipe to adapt to your own tastes, not only with the sauce ingredients, but also in regards to what vegetables you include.

Zucchini is our favorite, especially if you take the extra 15 minutes to salt it, but pretty much any dice-able seasonal vegetables will shine. So, please keep this one in mind as you browse the farmers market, but no matter what you put in, I really do hope you a give this delicious tofu dish a try soon. Enjoy!


Ingredients for 4 Portions:
1 1/4 pounds ground pork
1 pound firm tofu, cubed (my package was 14 ounces)
handful of sliced green onions
minced hot chili peppers, as much as you like
3 small zucchini, cubed, toss with 1 tablespoon kosher salt (rinse after 15 minutes)
freshly chopped cilantro to finish
sliced green onions for the top

For the sauce:
3 tablespoons Korean chili paste aka Gochujang, or other chili paste product to taste (click here to read a little more about Gochujang)
1/3 cup rice vinegar
1/4 cup hoisin sauce
2 tablespoons soy sauce
1 tablespoon ketchup
1 tablespoon sesame oil
4 cloves minced garlic
1 tablespoon finely grated ginger

Tuesday, July 3, 2018

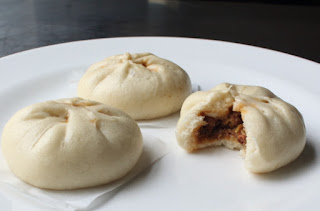
Steamed Barbecue Pork Buns (Char Siu Bao) – Sweet, Steamy Memories

In younger, leaner times, I’d often rely on the delicious, inexpensive calorie bomb that is the steamed barbecue pork bun. They were twice the size, and for a few bucks you could get very full…for about 30 minutes, and then you were starving again. Nothing a Mission-style burrito couldn’t fix.

Anyway, the filling was chopped Chinese-style barbecue pork mixed with some kind of mysterious, gelatinous red sauce, which was significantly sweeter than what I’m doing here. 

That’s probably why they don’t seem to come out quite the same as I remember. I probably need a lot more sugar, as well as copious amounts of MSG. Having said that, I was pretty pleased with my insides, but as usual I encourage you to freestyle. 

Here’s a link to a fairly classic pork bun filling recipe, in case you want something slightly more authentic, and since it looks just like the stuff I mentioned above, I might give it a try next time. But, regardless what you fill yours with, I really do hope you give these a try soon. Enjoy!


Ingredients for 12 Steamed Barbecue Pork Buns (Char Siu Bao):
For the dough:
3/4 cups warm water
1 1/2 teaspoons dry active yeast
2 teaspoons vegetable oil
1 1/2 teaspoon white sugar
2 cups *self-rising flour
For the filling (this made more than I needed):
2 cups chopped Chinese-style barbecue pork, or other barbecued pork product
1/4 cup finely sliced green onions
2 teaspoons sesame oil
1/4 cup hoisin sauce, or as needed
salt (soy sauce) and cayenne to taste
2 teaspoons white sugar, optional

*If you don't have self-rising flour, you can use 2 cups all-purpose flour sifted with 3 teaspoons baking powder and 1 teaspoon fine table salt.

Tuesday, June 26, 2018

Korean Barbecued Rack of Lamb – That Other Rack of Ribs

While less popular than beef and pork, lamb was the original barbecued meat (Google barbacoa for details), and may be the best suited for cooking over smoky coals. That’s especially true when paired with this very simple Korean-inspired marinade. This really did taste every bit as good as it looked, and that’s saying something.

Lamb has a slight, subtly sweet gaminess, which works perfectly with the funky goodness of our gochujang chili paste, and if you let it soak overnight, you’ll be rewarded with a juicy interior as well. I love using rack for this, since it’s more tender, and easier to work with than leg, and a little more user friendly than chops.

You should find gochujang at any grocery store where the cool kids shop, but if not, it’s available online. Here is the one I used, just in case that matters. If you do happen to splurge for a jar, trust me, you’ll use it all by the end of summer.

By the way, the ingredient amounts below will only allow for a few tablespoons of sauce, once reduced. If you want more, just double the amounts, and save half to add to your reduction. A little more sauce probably isn’t a bad idea, especially if there’s going to be rice around. Either way, I really do hope you give this a try soon. Enjoy!


Ingredients for 4 Portions:
2 trimmed racks of lamb (about 1 pound each)
2 tablespoons gochujang chili paste
6 cloves crushed garlic
1/4 cup finely minced green onions
2 tablespoons brown sugar
3 tablespoons rice vinegar
1 tablespoon sesame oil
1/4 cup soy sauce
1 teaspoon kosher salt

Tuesday, April 17, 2018

Miso Honey Chicken – Because Honey Miso Chicken Didn’t Have the Same Ring to It

It’s not hard to make a great marinade with just a few ingredients, as long as one of those ingredients is the magical miso. This super savory paste, made from fermented rice, barley, and soybeans, isn’t that hard to find, but what can be a challenge is understanding the different varieties available.

Miso is sold by “color,” and I’m recommending the white one here, except when you open the container, it’s not white, it’s sort of a golden yellow. They also sell a yellow miso, which is a slightly darker golden yellow, as well as a red miso, which is also a golden yellow. I’m just kidding…it’s actually dark brown.

The point is, the colors don’t refer to the actual color, but rather the processing method, and ratio of ingredients. And that’s basically the extent of my expertise. I choose the white, since it’s the most mild, but I encourage you to do some more research, as well as some experimentation.

After marinating overnight if possible, you’ll definitely want to cook your chicken with indirect heat. Otherwise, it will get too dark – as in black. Roasting in a 375 F. oven would be great, but if you use a charcoal grill, be sure to push your coals all the way over to one side of your grill, and place your chicken on the opposite site. Keep and eye on it, and turn/rotate the pieces as needed.

You can add many other things to this marinade, but maybe try the minimalist version first. I used to tell my students that the older you get, the fewer ingredients you use, so that’s my excuse, but I really want the clean flavors of the miso and honey coming through. Either way, I really hope you find some miso paste, and give this a try soon. Enjoy!


Ingredients for enough marinade for one whole chicken:
3 tablespoons white miso
2 tablespoons honey
1/4 cup rice vinegar
2 teaspoons hot sauce
1 tablespoon kosher salt (about 2 teaspoon fine salt)
lemon wedges and pepper flakes to garnish
- Let marinate overnight before roasting or grilling until the internal temp in the middle of the thigh is 165 F.
-->

Friday, March 16, 2018

Corned Beef & Kimchi Fried Rice – Just Like Your Irish-American-Korean Grandmother Used to Make

After too many requests to count, I’m finally posting my recipe for kimchi fried rice, and by “my recipe,” I mean everyone’s recipe, since give or take a handful of meat, they’re all pretty much the same. 

Having said that, I’ll give a shout out to the lovely and talented, Maanchi, since I checked her channel to make sure I wasn’t missing any key elements, as well as learn how to say, “gochujang.”

I’m not sure how close I got to the later, but except for the seaweed, I did get all the ingredients right. Of course, the diced corned beef is optional, but if you do have some leftover from your St. Patrick’s Day, I highly recommend you give it a try. Bacon is another fine choice, as is almost any other diced meat I can think of.

The egg is also technically optional, but not for me. The way the runny yolk mixes into, and moistens the rice takes this to a whole other level. The poached egg also paired quite nicely with my “landweed” garnish, as it does with the much more traditional shredded seaweed. But, no matter how you accessorize, I really hope you give this corned beef and kimchi fried rice a try soon. Enjoy!


Ingredients for 2 large portions:
1 generous cup chopped drained kimchi
2 tablespoons vegetable oil
1 1/2 cups diced corned beef or other meat
3 generous cooked rice, (I find cold works best for crustification)
1/4 cup kimchi juice
1/4 cup water
2 tablespoons gochujang chili paste
1/2 cup sliced green onion
2 teaspoons toasted sesame seeds
2 teaspoons sesame oil, or to taste
2 poached or fried eggs
shredded seaweed to garnish, optional

Friday, March 9, 2018

Kimchi Corned Beef – Adding Some Seoul to St. Patrick’s Day

I’ve always loved St. Patrick’s Day, since apparently that’s the only day of the year I get to eat corned beef and cabbage. Besides the copious amounts of salt, nitrates, and fat, I have no idea way we’re not eating this stuff a couple times a week. Anyway, because this is usually an annual thing, most folks make it the same way, year after year, but that’s never been my M.O. I like to think of ways to creatively tweak the recipe, so that while I’m enjoying my new creation, I can think about how much I’d wished I just boiled it in water, with that little packet. 

What I’m trying to say is, not every attempt has been a homerun. Or whatever a homerun in Irish hurling is. This, however, was a success. The spicy, fermented cabbage, added a lot of extra savoriness, and not only to the meat, but even more so to the vegetables.  The potatoes especially soaked up a surprising amount of flavor, and may have been my favorite part of the whole dish.

I used a corned beef made from the round, instead of the traditional brisket, which worked out much better than I thought it would. If you do decide to go this lower fat option, be sure not to cook it too long. The fork should pierce the meat without too much force, but we do not want to meat falling apart, as it will become dry and chalky. Chances are you’re going to use a brisket anyway, which is much more forgiving, but something to keep in mind if you do go with the round. Either way, I really do hope you give this a try soon. Enjoy!


Ingredients for 6 portions:
1 ready to cook corned beef (mine was about 3 1/2 pounds)
4 cups kimchi, not drained
1 cup cold water or as needed
2 pounds Yukon Gold potatoes, quartered
3 large carrots, cut in large chunks
2 ribs celery, cut in large chunks
green onions to garnish

Friday, February 16, 2018

Chinese Scallion Pancakes – Happy New Year, Dog!

Happy Chinese New Year! It’s the Year of the Dog (and not the Manatee), and to celebrate I thought I’d show you my take on Chinese scallion pancakes. These fun-to-make flatbreads are a common fixture on menus around here, and while they all feature the same few ingredients, they come in a variety of thicknesses, which really affects the texture.

The thinner you make these, the crispier they’ll be, but you won’t get that nice, layered, oniony inside. On the other hand, if you make them too thick, they can be a little doughy inside, so I try to shoot for something in between. Speaking of inside, feel free to add pepper flakes or other appropriate embellishments before you roll these up.

Ideally, you leave the dough overnight before using, but I’ve always had great results with just a couple hours rest on the counter. If you do leave overnight, you’ll probably get a better flavor, and maybe texture, but the dough will be more elastic, and slightly more difficult to work with.

As far as the dipping sauce goes, I like to mix equal parts seasoned rice vinegar, and soy sauce, flavored with a shot of hot sauce, and maybe grating of fresh ginger. Toss in a few sliced green onions, and you’ll have yourself a very basic, but perfect condiment for these savory pancakes. Regardless of how you serve them, I really hope you give these a try soon. Enjoy, and gung hay fat choy!


Ingredients for 2 Chinese Scallion Pancakes:
one bunch green onions, mostly green parts, sliced thinly
For the dough:
2 cups bread or all-purpose flour
1 1/2 teaspoon kosher salt
3/4 cup hot water
- adjust with more flour or water to form a smooth, but sticky dough
For the oil mixture:
3 tablespoon veg oil
2 teaspoons sesame oil
1 tablespoon plus 1 teaspoon flour

- serve with dipping sauce, as described in the blog post

Friday, February 9, 2018

Creole Crab Noodles – Mardi Gras Fusion

I’m calling this Creole crab noodles recipe an “experiment,” but it didn’t really feel like one, since I was sure it was going to come out really well, which it did. Crab, and its old friends, the Holy Trinity, are a classic combo, and so it was no surprise they worked so well in an Asian-style, rice noodle dish.

If you can get fresh crab meat, by all means use that, but if not, pretty much every large grocery chain carries pasteurized crab in 8-ounce plastic tubs, which works perfectly fine for this. And if shellfish isn’t your thing, I’ve got some great news. This exact same dish can be made with literally any other other meat and/or vegetable.

You can also do this with your favorite pasta, but like I said in the video, there are few foods as addictive, and fun to eat as rice noodles, so I’d advise against it. Besides, you can finally have that gluten-free friend of yours over to make up for all those pizza-night invites. So, whether you make this for Mardi Gras or not, I really do hope you give it a try soon. Enjoy!


Ingredients for 2 large portions:
8 ounces crab meat
2 tablespoons vegetable oil
1/3 cup finely diced green onions, plus more for garnish
1/3 cup finely diced celery
1/3 cup finely diced hot and/or sweet peppers
8 ounces rice noodles, soaked, drained

For the sauce:
3 cloves crushed garlic
3 tablespoons ketchup
1/4 cup seasoned rice vinegar
1 tablespoon soy sauce
1 tablespoon fish sauce
1 teaspoon paprika
1 teaspoon cumin
1/2 teaspoon cayenne

Tuesday, January 23, 2018

Sticky Garlic Pork Chops – What Do You Think, About Slightly Pink?

This sticky garlic pork chop recipe seems too good to be true. It only takes a few minutes of prep work, requires no tricky techniques, and doesn’t call for any hard-to-find ingredients.

And for the last time, Asian fish sauce is not hard to find. It used to be, but it’s now carried in every major grocery store, and I consider it a must-have in anyone’s kitchen.

Above and beyond the sauce, which is also our marinade, the other key to this recipe is finding some nice, thick, bone-in pork chops. While this will theoretically work with thin, boneless “chops,” we give ourselves much more room for error when it comes to achieving the perfect doneness.

Speaking of which, I shoot for about 140 to 145 F. internal temperature, which will produce a very juicy, tender piece of meat. Sure, you may see a subtle, pale pink hue, but it’s still perfectly safe to eat, and you’ll be amazed at how much nicer the texture is, especially after sitting in the brine-like marinade.

Of course, if you’re one of these people who always cooks pork well done, because your grandparents told you about the horrors of trichinosis when you were a kid, then fine. Go ahead and cook it all the way through, until it’s nice and dry, but you really are missing out. You’re still not convinced? Either way, I really do hope you give these sticky garlic pork chops a try soon. Enjoy!


For the marinade/sauce mixture (would probably be enough for 4 chops):
1/3 cup light brown sugar
6 to 8 cloves crushed or very finely minced garlic
1/4 cup rice vinegar
2 tablespoons Asian fish sauce
1 tablespoon soy sauce
1 tablespoon ketchup
1/2 teaspoon freshly ground black pepper
2 teaspoons hot sauce, or to taste

1 teaspoon vegetable oil
2 thick-cut pork chops, bone in (about 10 to 12-ounce each)

Friday, October 20, 2017

Potstickers – For When You Can’t Decide Between Fried and Steamed Dumplings

Potstickers (or Pot Stickers, depending on which style guide you’re using) are very fast and easy to make, unless you only do them once or twice a year, in which case they’re going to take a little bit of time to fold and shape. 

Just for fun, find a video that shows professionals doing these, and marvel at how they come together in seconds. That's what happens when you do hundreds each day, for years.

Having said that, every second spent producing these, is a second well spent. The play between the crispy, crusty bottom, and the tender parts, makes for a truly unique dumpling. They’re also very versatile, since you can fill them with anything you want. No matter what you use, you’ll know exactly what you’re biting into, which is not always the case when you get these out.

Don’t get me wrong; I love the occasional take-out binge, and its associated mysteries. But, it’s nice being able to control the contents, as well as the generosity of the filling. There is nothing worse than biting into one of these, and realizing it’s only half-full. So, for all those reasons, and more, I really hope you give these a try soon. Enjoy!


One production note: While I’ve made these many times, I’ve never actually measured the ingredients before, so I ended up with extra filling. So, I’ve increased the dough amounts from what I used in the video. Instead of getting 24 wrappers, you should get more like 32 (cutting each quarter dough into 8, instead of 6 portions), which should be a better match. Of course this depends on exactly how much you fill, but it should be close.

Ingredients:
For the filling:
1 pound ground pork
4 cloves minced garlic
1/2 cup finely chopped green onions
3 tablespoons very finely minced ginger
2 tablespoons soy sauce plus 1 teaspoon soy sauce
1 teaspoon sesame oil
pinch cayenne
1 1/2 cups finely chopped green cabbage

For the dough:
2 1/2 cups all-purpose flour
3/4 teaspoon kosher salt
1 cup hot water (about 130-150 F.)

For the dipping sauce:
1/4 cup seasoned rice vinegar
1/4 cup soy sauce
Optional: You can spike dipping sauce with things like hot sauce, garlic, minced green onions, ginger, etc.