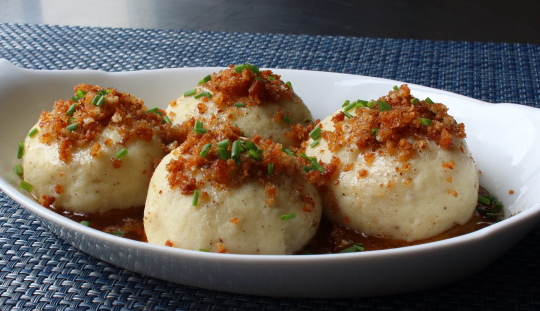
Sorry for the late upload, but I had some mysterious modem issues, and this German potato dumpling video took over 5 hours to upload! I was having flashbacks to those good, old dial-up AOL days, and they weren’t good flashbacks. I do miss that cool modem sound, but that's about it.
Anyway, it’s late, but I wanted to post the ingredient amounts, and maybe I'll add some more info tomorrow, although these are so basic that’s probably not necessary. The only tip I’ll give is that I think baking the potatoes works better than boiling them whole. Peeling, quartering, and boiling until tender will also work, but don’t overcook them, otherwise they'll absorb too much water.
By the way, if you’re German, or know the same things they do, I’d love to learn why we're sticking croutons in the middle of these things. I totally get the crumbs on top, but inside? If you have an explanation, I’d like love to hear it, and in the meantime, I really do hope you give these a try soon. Enjoy!
Ingredients for 8 to 10 German Potato Dumplings:
2 large russet potatoes (about 1 1/2 pounds)
salt, freshly ground black pepper, and cayenne to taste
As I may have mentioned on Twitter several times, Micheleand I have both been sick all week, so please pardon the lateness, and brevity of this post. The good news is this Greek-style baked beans recipe is very simple, and there’s not a lot of extra info I need to pass along.
One thing I will mention is that while these are baking, be sure to peek once in a while to see if you need to add more liquid. You can bake covered, but then you don’t get the crustification on top, so I prefer to bake uncovered, and stir in a splash of water, or two, if it looks like it’s getting too dry.
If you can find gigante beans, they really are the best, but Conona beans also work great, as will any other large dried bean. Just be sure to soak them properly, and simmer them until tender before proceeding to the baking step. Now, if you’ll excuse me, I’m climbing into my big, fat bed. Enjoy!
Ingredients for 12 portions:
1 pound dried Gigante, Conona, Lima, or other large dried bean (soaked overnight)
3 quarts cold fresh water to boil in
2 bay leaves
1 large red onion, diced
3 cloves garlic, sliced
2 cups tomato sauce or finely chopped fresh tomato
2 tablespoons tomato paste
3 tablespoons clover honey
1/2 cup chopped fresh dill, plus more for the top
1 tablespoon kosher salt (2 teaspoon if using fine table salt)
1 teaspoon freshly ground black pepper
cayenne to taste
1/2 cup extra virgin olive oil
1/4 cup red wine vinegar
2 cups water, plus more as needed while baking 4 ounces feta cheese for the top
These deceptively simple, yet devastatingly delicious garlic noodles were invented in San Francisco, at a restaurant called, Thanh Long, back in the 70’s. Usually served with roasted Dungeness crab, the actual recipe is a very closely guarded family secret, but after lots of investigation, and even more experimentation, I think this is very close, at least for a non-MSG laced version.
Apparently, one of their “secret” ingredients is something called, Maggi Seasoning Sauce, which I decided not to use, since I’m not sure how easy it is for the average person to find. Besides, I think my assortment of savory, umami-rich substitutes did the job quite nicely, and everything in the ingredient list can be found at any large grocery store.
The most exotic thing here would be the oyster sauce, which is sort of a very savory, slightly sweet, thick, soy sauce-like condiment. And yes, it does have oyster extracts in it, in case that matters. If you can’t find it, just add a touch more fish sauce, soy, and Worcestershire, as well as little brown sugar.
Most garlic noodles actually call for sugar in the recipe, but I think that makes it too sweet for my taste, since the oyster sauce is fairly sweet, as is all that sautéed garlic. Regardless, whether you enjoy this with some roasted garlic crab, or as is, I really do hope you give it a try soon. Enjoy!
Ingredients for 2 small portions Garlic Noodles: PLEASE NOTE: The saltiness of the following ingredients can vary, as can how sensitive people are to the taste of salt, so you may need to increase or decrease the amounts below.
Brazilian cheese bread is very easy to make, and features a chewy, cheesy, bready center, encased in a beautiful, thin, pastry crust. It also happens to be gluten-free, thanks to it being root-rich. These are made using tapioca flour, which not only makes them grain-free, but is also responsible for their very unique texture.
Tapioca flour is pretty easy to find these days, and I get mine from a guy named Bob, who runs a mill, but if your local market doesn’t carry it, I recommend finding some online. There are lots of fun recipes you can make in addition to these, like homemade tapioca pearls for bubble tea, just to give one enticing example.
As I mentioned in the video, you can easily adjust the thickness of your dough by adding another splash of milk, or more tapioca flour depending on what you're into. Some folks swear by a thinner batter, which they bake in muffin tins, but to me those come out too much like popovers, and don’t have the same chewy, cheesy center.
Happily, Brazilian cheese bread ingredients are fairly inexpensive, which means you can play around with a few batches, and see for yourself. No matter what you end up with, I really do hope you give these a try soon. Enjoy!
Ingredients for 24 Brazilian Cheese Breads:
(Please note, I only made half a batch)
2 1/4 cups tapioca flour, plus more as needed to adjust texture
1/2 cup lightly flavored olive oil and/or vegetable oil
These crispy yuca fries are often presented as a healthier alternative to fried potatoes, but the taste and texture is so good, I think it would be more appropriate to describe French fries as a less-healthy alternative to these. They really are that good, and do a great job of bridging the gap between regular fried potatoes, and sweet potato fries.
Once fried, the texture is remarkably similar to a russet or Kennebec potato (the variety most commonly used for fries and chips), and while these do have a slightly sweeter taste, it’s not nearly as pronounced as a sweet potato. Like I mentioned in the video, I always regret ordering sweet potato fries, since, to my palate at least, they’re just not savory enough, which is not the case with these.
Just be sure to boil them first, since they can be toxic eaten raw in larger amounts. Why you’d ever want to eat a big pile of raw yuca is beyond me, but the legal department wanted to mention that regardless. Anyway, once safely cooked, they can be pan-fried crispy as seen here, or deep fried, or place them on a foiled sheet pan, brush them with oil, and bake at 425 F., turning occasionally until they’re browned and crusty.
I was going to finish by listing off other ways you can use this delicious root, but to save time I’ll just say that if a recipe works with regular potato, it will work with yuca. And maybe even work better, which is why I really do hope you give this a try soon. Enjoy!
Ingredients:
- Yuca root (aka cassava), peeled, cut, and boiled until just tender in salted water * Please note: on larger roots there may be a tough fibrous part running through the middle, which can be trimmed out after boiling. These didn't really have one, but you'll know if yours do.
They say your greatest strength is also your biggest weakness, which certainly is true when it comes to sweet potatoes.The starchy sweetness that makes this tuber such a popular holiday side dish, is also its fatal flaw, since, for me at least, it quickly leads to palate fatigue. After a few bites of mashed sweet potatoes, or sweet potato casserole, I’m pretty much over the experience, and I’m reaching for the cranberry sauce to reset my tongue, but here we’ve mixed in a few ingredients specifically selected to cut that sweetness, and push this much closer to the savory side of town.
Lime, jalapeño, and sharp cheddar may seem like odd choices here, but paired with the green onions, and bacon, they work wonders, and I had no problem finishing a whole sweet potato. And by whole, I mean two. By the way, these orange-fleshed sweet potatoes are often sold as “yams,” but they’re not, in case that ever comes up in conversation.
Besides all the obvious reasons, this is a great choice for your Thanksgiving table, since you can prep it ahead of time, and then bake them when you’re ready to serve.They will also stay hot for quite a while, which is another reason they’re nice around the holidays, when oven space can be limited. So, whether you make these for a special occasion, or some completely un-special weeknight meal, I really do hope you get give these loaded, twice-baked sweet potatoes a try soon. Enjoy
Ingredients for 4 portions:
4 orange-fleshed sweet potatoes, scrubbed clean
8 ounces bacon, sliced
1/3 cup sliced green onions
1/4 cup diced jalapeno
1/2 cup grated sharp white cheddar cheese, plus a little bit for the top
2 tablespoons crème fraiche, or sour cream
2 teaspoons fresh lime juice
salt, freshly ground black pepper, and cayenne to taste
Soufflés have always had the reputation for being a difficult, and temperamental thing to make, which I’ve never really understood. As long as you can manage to whip some egg whites, and fold them into your batter without knocking all the air out, there’s really not much that can go wrong.
And that’s with the traditional method, which requires making a saucy base first. These soufflés are even easier than that, since mashed sweet potato is the base. I like to microwave my sweet potatoes, mostly because it’s faster, but you can certainly roast them in a 375 F. oven instead. Just prick them as shown, and bake for as long as it takes to get them very soft. I’d love to give you a time, but that depends on the size.
I kept these very plain, so as not to distract you, but you can add all sorts of things. Cheese, bacon, and herbs, just to name a few. And that’s for savory applications, since these will also shine as a dessert. Just add some maple syrup or brown sugar to the mashed potatoes, to taste, along with appropriate spices, like cinnamon, nutmeg, and allspice, and you'll be in for quite the seasonal treat. But, no matter how you flavor these, or which course you serve them, I really do hope you give them a try soon. Enjoy!
Ingredients for 4 to 6 Sweet Potato Soufflés:
2 teaspoon room temp butter to grease ramekins (mine were 5 oz. size)
If you’re going to steal one Rick Bayless recipe, you might as well steal two, which is exactly what I did here with this green chile pesto, and roasted chayote squash side dish. Like I said in the video, most great chefs encourage this type of thievery, as long as you give them credit, which I’m happy to do.
What I’m calling “Green Chile Pesto,” is really his Green Chile Adobo, but I thought my audience would better relate to a “pesto,” since that’s what this reminds me of the most. Although, I’m not sure how it would be in a pasta, and don’t have any immediate plans to find out.
What it was great in, was this very simple chayote squash dish, which is really more of a warm salad. If you can find chayote near you, I recommend you give it a try, but if not, grilled zucchini or other summer squash would also work, as would something like roasted acorn or delicata squash.
I’d try to choose a fairly mild olive oil for this, since we have enough heat and bitterness from the peppers. Which reminds me, don’t over blend this. While some chefs claim it’s just a wives tale, I’ve found that if you over-process an olive oil-based sauce, especially ones with garlic in them, it can get very bitter. Other than that, not much can go wrong, and so on behalf of Chef Bayless and myself, I’d like to say, we really do hope you give it a try soon. Enjoy!
Ingredients for the Green Chile Pesto:
6 Serrano peppers
1 Poblano pepper
6 cloves garlic, still in the paper
1 bunch cilantro
1/2 bunch Italian parsley
1 1/2 teaspoon kosher salt (or about 3/4 teaspoon fine salt)
3/4 cup mild tasting olive oil, or vegetable oil
juice from 2 fresh limes*
* You can add the lime right to the pesto if you’re going to use it all at once as a sauce for something, but this seems to keep longer in the fridge without it added in, and so I prefer to add it to whatever I’m using it with instead.
For the Chayote Squash Side Dish:
3 Chayote squash, cut in 1-inch pieces
1 tablespoon olive oil
1/2 teaspoon kosher salt
juice from 1 lime (unless already added to your pesto)
2 or 3 heaping spoons of Green Chile Pesto
1/3 cup crumble soft goat cheese, plus more for the top
The hardest line cook job I ever had was working the broiler station at the Carnelian Room, where on a busy night I’d prepare over 250 steaks and chops, which wasn’t even the most difficult part. No, the biggest challenge was actually frying these potato puffs to order, to go on all those plates.
It was a lot of work, but a labor of love, since pomme dauphine, as my French friends would call this, is one of the greatest foods ever invented, especially for potato fanatics like me. However, as with most fried foods, they can be messy to make, and unless you have an industrial-strength hood fan, your kitchen will smell like a deep fryer for days, which is why I wanted to try and do a baked version.
I was very happy with the results, and while the outside wasn’t dark and crispy like the fried version, the inside was virtually identical, and thoroughly enjoyable in their own right. Whether you’re making them as a warm snack with a dip, or to go alongside some eggs, or a grilled steak, the baked version should work out just fine.
Of course, since we’re getting close to Thanksgiving, if you are one of these people who deep-fries the turkey, I would probably go with the traditional method. Especially since you’ll be cooking outside where sneaking a few of these while you’re working will be pretty easy to get away with. Either way, I really do hope you give these potato puffs a try soon. Enjoy!
Ingredients for 12 Small Baked Potato Puffs:
(I did a tiny test batch, so I highly recommend doubling or tripling the recipe)
1 cup cooked, plain mashed potatoes (Yukon or Russet)
salt and cayenne to taste
small pinch of freshly grated nutmeg butter for the muffin tin
For the pastry dough:
1/4 cup water
2 tablespoons butter
1/4 cup flour
pinch of salt
1 large egg
- For a mini muffin tin*, butter well, and bake at 450 F for about 20 minutes, or until browned and puffed.
- Or, deep-fry at 375 F for a few minutes until browned and puffed.
* These might work in a regular muffin tin, but you’ll need to bake longer.
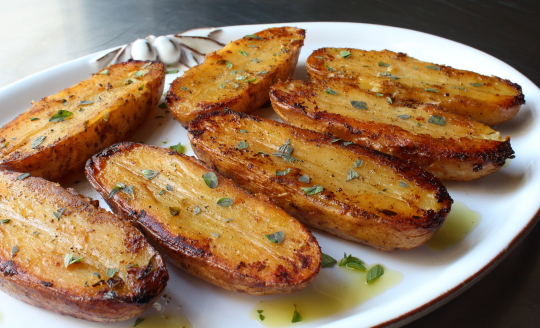
If you’ve made and loved our Greek Lemon Chicken, and Fondant Potatoes, then you will absolutely adore these lemon pepper potatoes, since it’s basically the best of those two recipes put together, minus the chicken. The only problem is, whatever main course you decide to go with is in serious danger of being upstaged.
Speaking of chicken, if you happen to be roasting one, besides keeping the bones for stock, be sure to save the rendered fat as well, since that will elevate this dish to even greater heights. Also, feel free to add some garlic here, but if you do, I’d go with whole cloves, since minced garlic may burn onto the bottom of the dish towards the end of the roasting time.
These are incredible eaten hot and fresh, but if for some reason you don’t finish them all, they make the best homefries you’ll ever eat. Just cut them up, and fry in some olive oil until crispy. They’re so good, you’ll be tempted to make them just for that purpose, although that will take way more willpower than I possess. Regardless, I really do hope you give these Lemon Pepper Potatoes a try soon. Enjoy!
Ingredients for 8 Portions Lemon Pepper Potatoes:
4 large russet potatoes
salt, freshly ground black pepper and cayenne to taste
1/4 cup olive oil, or enough to cover bottom of baking dish
fresh oregano springs, optional
1 cup chicken broth
2 teaspoons lemon zest
juice from 1 or 2 lemons
- Roast at 400 F. for 20 minutes, flip and cook another 15 min., then flip again, and continue roasting until very tender and crusty.
I’ve never been a huge fan of German potato salad, for two very good reasons. First of all, my love for mayonnaise borders on inappropriate, and secondly, the potatoes always seem to be under-cooked.
I enjoy many things cooked al dente, but potatoes are never, ever one of them. I know people want clean, neat slices, but to me that’s just not a good enough reason.
However, if they’re cooked tender, especially over some smoky coals, I can forgive the lack of mayo, since this is a very flavorful change of pace, and as I mentioned in the video, perfect for bringing to a cookout. A German potato salad must be eaten warm, or at least room temp, so placing a bowl of this on a sunny picnic table works out very well.
I use a ton of bacon in my version, because it’s bacon, but if you do decide to use less, you’ll have to add some vegetable or olive oil to the dressing to make up the difference. You could just use less vinegar, but then you might not have enough dressing to really soak the potatoes, which would be a shame. So, what I’m trying to say is, use a lot of bacon. Either way, I really do hope you give this great potato salad a try soon. Enjoy!
Ingredients for 8 Portions Grilled German Potato Salad:
2 1/2 pounds Yukon gold potatoes, grilled until just tender
1/4 cup freshly chopped Italian parsley
For the dressing:
8 ounces sliced bacon
1 cup diced yellow onion
2 tablespoons white sugar
2 teaspoons kosher salt, plus more as needed
1 teaspoon freshly ground black pepper
cayenne to taste
1/2 cup white wine vinegar
Note: If you want you dressing tangier, add more vinegar, but if you want it less so, you’ll have to adjust with vegetable oil, since you can’t add more bacon fat.
Like I said in the intro, I’ve never been a huge fan of quinoa, or tabbouleh, but for some reason absolutely love this green quinoa tabbouleh. Maybe it’s the size of the grain, which is actually a seed, or the less wheaty flavor, but for me this vibrant, bracing salad is significantly better with quinoa instead of the traditional bulgur wheat.
Whether you do this with quinoa or bulgur, I recommend keeping the salad relatively simple, and then using it as a base for other composed salads. Of course, you can mix in diced tomato, cucumber, and chopped green onions the same time you add your herbs, but then you’re sort of stuck with that exact salad.
I prefer to make this as shown, and then add my garnishes when I serve it. That way I can have it as described above one day, and then the next day, enjoy a completely different salad, with new accessories like diced grilled chicken, zucchini, and feta, just to give you an idea off the top my head.
Regardless of how you jazz this up, we’re heading straight into the middle of grilling season, and for me, this is one of the all-time great cold side dishes, since it pairs so perfectly with all those highly-seasoned, smoky meats. So, for those reasons and more, I really do hope you give this green quinoa tabbouleh a try soon. Enjoy!
Ingredients for 6 portions:
2 large bunches curly parsley
1 large bunch mint
1 bunch tarragon
6 cups of boiling water
2 cups rinsed white quinoa
salt as needed to taste
freshly ground black pepper to taste
cayenne taste
2 or 3 garlic cloves
2 or 3 whole lemons, plus more to taste
1/2 cup extra virgin olive oil, plus more as needed
I always look forward to seeing delicata squash appear in the Fall, but with that comes a certain amount of frustration, since I’m pretty sure there are plenty of shoppers who walk right past it, thinking it’s some sort of decorative gourd. They do look like those ornamental cornucopia fillers, which is why I’ve been tempted to walk up to people at the market, who I’ve seen look at these, but not put in their basket, and tell them what a big mistake they’re making. Of course I haven't, since that’s just not done.
The point is, not only would these dress up any holiday table, but they're also absolutely delicious, uniquely textured, and easy to prepare; as long as you don’t cut off a finger. Much like our friend the butternut squash, these are very hard, and you have to be extremely careful when cutting. I think the technique shown herein is a pretty safe way to go, since your fingers are well away from the blade.
Once prepped, season to your liking, with salt and oil being the only mandatory ingredients, and then roast in a hot oven, until tender, and as caramelized as you like. I usually don’t flip halfway through, since I’d rather have one really crusty side, than two sort of crusty sides. Once baked, these can be served hot as a side dish, room temperature as a snack, or cold in a salad. Regardless of how you enjoy them, I hope you give these roasted delicata squash a try soon. Enjoy!
Ingredients for 2 portions:
1 large delicata squash
1 tablespoon olive oil
1 teaspoon salt
cayenne pepper to taste
- Roast at 450 F., for about 12 to 18 minutes, depending on how thick your slices are.
-- My “Pumpkin Spice Aioli” was mayonnaise, seasoned with garam masala, turmeric, and hot paprika to taste.
Apparently “Spätzle” translates to “little sparrows” in German, which makes a lot of sense when you consider their shape. What doesn’t make sense is why these micro-dumplings are also called “spaetzle.” Is it an alternate spelling? A different recipe? I’m hoping maybe some of our German foodwishers can clear this up.
Since my favorite German restaurant calls this stuff spätzle, that’s what I went with, and they are as easy to make, as they are hard to correctly pronounce. You only need a few ingredients, all of which you generally have on hand at all times, and they take just minutes to cook.
Once boiled, you can toss in butter like I did, or sauce them any way you’d sauce similarly shaped pasta. While wonderful served as-is, they make the perfect side dish to any large hunk of slowly braised meat. I paired mine with a pork shoulder stewed in hard cider, and it was amazing.
I thought I’d posted a video for that, but it was actually a cider-braised pork cheeks recipe I was thinking of, which would work perfectly here. So, I may have to do a braised pork shoulder after all. In the meantime, I’m sure you’ll have little trouble figuring out what to serve yours with, and I really do hope you give this Spätzle recipe a try soon. Enjoy!