Showing posts with label Vegetables. Show all posts

Tuesday, January 22, 2019

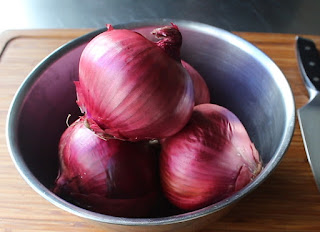
Tuscan Onion Soup (Carabaccia) – French Onion Soup Before It Was French

I’ve wanted to make carabaccia ever since I found out it was the ancient ancestor of French onion soup. Not only is that an interesting fact, but it’s also a great addition to your dinner party conversation repertoire, especially where there are French chefs involved.

Okay, now let’s talk cinnamon. The safe play is to not add any, and live happily ever after. However, in very, very small amounts, it really does add a mysterious, wonderfully warming background note that you actually might enjoy. There’s only one way to find out, but please proceed with caution. Too much will render the soup inedible, and there’s really no way to know what “too much” is.

As I mentioned in the video, if you want to cut down on the stirring, you can cook the onions in a roasting pan. Just pop them in a 325 F. oven until they’re done, stirring a few times along the way. How long exactly is anyone’s guess, but just like the stove-top method, take your time, and wait until they are very soft.

So, whether you’re a culinary history buff like me, and want to taste what French onion soup tasted like 500 years ago, or it’s freezing outside, and a steaming bowl of something delicious sounds good, or both, I really do hope you give this a try soon. Enjoy!


Ingredients for 6 Portions:
4 pounds red onions, sliced
2 tablespoons olive oil
1 tablespoon kosher salt
3 sage leaves, plus more for toast
1/4 cup finely ground almonds
very tiny pinch of cinnamon*
3 tablespoons red wine vinegar, or to taste
5-6 cups beef, chicken, or vegetable broth
freshly ground black pepper
freshly grated pecorino or parmesan cheese

For the toast:
3 thick slices Italian bread, halved
dress with olive oil, sage and grated Pecorino or Parmigiano-Reggiano cheese
- Toast in a 400 F. oven for 15 minutes or until browned.

* While traditional, many people don’t enjoy the effect cinnamon has on the sweetness of the soup, so you may want to omit it, or add an extremely small amount, and then adjust from there. You can also make the soup without any, and then experiment by adding a trace amount to a small sample cup, and see what you think.
-->

Friday, January 11, 2019

Samosadilla (Samosa Quesadilla) – Flat Better

I love samosas, but I don’t necessarily love all the work and mess involved with assembling and deep-frying them, which is why I’m such a huge fan of this quesadilla approach. Plus, above and beyond the faster, simpler method, the results may be even better than the original. Okay, hear me out.

While it’s true a perfectly made, expertly fried, and quickly served samosa is superior to this version, that can be a very rare combination of events. By comparison, this is almost impossible to mess up, and if you use enough oil in your pan, you should be able to achieve a beautifully browned, crispy crust that rivals something out of a deep fryer.

Like I said in the video, even if you don’t make samosadillas, the filling is a world-class potato salad in its own right. A scoop of this next to some grilled meat, like tandoori chicken for example, would make for a gorgeous plate of food. Fair warning though, Michele and I like big, bold flavors, so please feel free to adjust the ingredient amounts below to your tastes. Whether they’re enjoyed hot, warm, room temp, or cold, we really do hope you give these samosadillas a try soon. Enjoy!


Ingredients for about 6 Portions:
6 large flour tortillas
1 tablespoon olive oil
1 tablespoon butter
1 large yellow onion, diced
3 cloves finely chopped garlic
1 minced Serrano chile
1 1/2 teaspoons finely chopped fresh ginger
1 teaspoon kosher salt plus more to taste
1 1/2 teaspoon garam masala
1 teaspoon ground cumin
1/2 teaspoon ground corinader
1/2 teaspoon turmeric            
1/4 teaspoon cayenne
1 cup green peas
1 1/2 pounds cubed Yukon gold potatoes, cooked until tender in salted water
2 tablespoons chopped cilantro
juice from 1 lemon
salt to taste once mixed

For the Cilantro Lime Chutney Sauce:
1 large or 2 small bunches fresh cilantro
1/3 cup fresh picked mint leaves
1/4 cup sliced green onions
1 sliced Serrano chile
1 or 2 limes, juiced
1/2 cup plain yogurt
pinch of salt, optional
-->

Tuesday, December 4, 2018

Kimchi Pancakes – Come for the Savory Pancake, Stay for the Dancing Fish Flakes

I remember getting a request for kimchi pancakes many years ago, and while I recall being intrigued, apparently not enough to actually research the recipe, and do a video for it. That all changed after seeing it on a local bar menu, where Michele and I enjoyed not one, but two orders of these incredibly tasty, and visually thrilling, savory pancakes.

I loved the taste and texture, but what really got my attention were the dancing bonito flakes on top. I’d never seen anything quite like that, and found it as mesmerizing, as I did delicious. As I mentioned in the video, those kimchi pancakes came with a little drizzle of spicy mayonnaise, which depending on how decadent of an experience you’re going for, isn’t a bad idea, especially if you plan on frying these up, and cutting them in wedges to serve as a snack at a party.

If you want a thicker, and more substantial kimchi pancake, you want to use less liquid, or more flour, so that your batter isn't quite as runny as mine. Personally, I enjoy this style a little more, since you end up with a thinner pancake that’s crispy around the edges, but still moist and tender inside. Having said that, you should definitely experiment with different textures to see what you like best.

These are also a perfect catchall for leftover meat and vegetables. Just chop it up, toss it in, and see what happens. Speaking of seeing what happens, if you want to watch fish flakes dance, you’ll have to find some bonito, which means finding an Asian market, or buying them online, and I highly recommend you do just that. Either way, I really do hope you give these a try soon. Enjoy!


Ingredients for 4 Appetizer Size Kimchi Pancakes:
1 1/2 cup chopped drained kimchi (12 ounce jar)
1 large egg
3 tablespoons kimchi juice
1/4 cup water
1 teaspoon brown sugar
1/2 teaspoon salt
1/2 teaspoon sesame oil
1/2 cup thinly sliced green onions
about 3/4 cup all purpose flour, or as needed
4 tablespoons bonito flakes for the top, optional
-->

Friday, October 26, 2018

Pig in a Pumpkin – Trick and Treat

Okay, so we’re not using a whole pig, but we are using a whole pumpkin, which not only produced some very succulent, flavorful pork, but also made for an absolutely stunning presentation. This looked so good, that many people might think it was faked, which really is the ultimate compliment.

While this would work in any pumpkin, try to find ones sold as “sugar,” or “pie” pumpkins,” since they have a thicker, sweeter flesh, compared to the ornamental ones sold for jack-o'-lantering. I believe the variety I used was called “cannonball,” but simply look for round, heavy-feeling varieties about the size of a volleyball, displayed in the produce department, and not outside, or in front of the store.

As I said in the video, you can season this anyway you want, but regardless of what exactly goes in your gourd, make sure you roast it until the meat is tender. How long will depend on the size of course, so be sure to test the meat as it cooks. The only thing I’d do differently next time, would be to pour in a little more cider after a few hours in the oven, since a lot of it evaporated as it roasted, and I wanted more “sauce” when I was done.

After you remove the meat for service, ladle out all the braising liquid, and let it sit for a few minutes, so you can skim off most of the fat. Thanks to the little bit of flour on the pork, it should have a nice thickness, but you can always adjust that with some more roux. Or, simply make a sauce separately, and then just spike it with your drippings.

Also, if you wanted to add another step, you could use a blender to make a smoother sauce, but I’ll leave that up to you. Either way, if you’re looking for a fun, and very seasonably appropriate way to cook some pork shoulder, I couldn’t think of a better, or more beautiful way, which is why I really hope you give this a try soon. Enjoy!


Ingredients for one Pig in a Pumpkin:
1 volleyball-sized cooking pumpkin
3 1/2 to 4 pounds of boneless pork shoulder
1 rounded tablespoon kosher salt (the pumpkin will absorb some of this)
2 teaspoon freshly ground black pepper
1/4 teaspoon cayenne pepper
1/2 teaspoon dried thyme
1 teaspoon crushed fennel seeds
1 tablespoon freshly chopped rosemary
1/3 cup thinly sliced shallots
- garlic and sage would have also been great here
2 tablespoons flour to coat pork
1 tablespoon olive oil for browning meat
at least 2 cups hard cider, or more if you can fit it in before or during cooking

- I roasted mine at 350 F. for about 4 hours
-->

Tuesday, October 23, 2018

Sweet Potato Soufflés – Even Easier Than Easy

Soufflés have always had the reputation for being a difficult, and temperamental thing to make, which I’ve never really understood. As long as you can manage to whip some egg whites, and fold them into your batter without knocking all the air out, there’s really not much that can go wrong. 

And that’s with the traditional method, which requires making a saucy base first. These soufflés are even easier than that, since mashed sweet potato is the base. I like to microwave my sweet potatoes, mostly because it’s faster, but you can certainly roast them in a 375 F. oven instead. Just prick them as shown, and bake for as long as it takes to get them very soft. I’d love to give you a time, but that depends on the size.

I kept these very plain, so as not to distract you, but you can add all sorts of things. Cheese, bacon, and herbs, just to name a few. And that’s for savory applications, since these will also shine as a dessert. Just add some maple syrup or brown sugar to the mashed potatoes, to taste, along with appropriate spices, like cinnamon, nutmeg, and allspice, and you'll be in for quite the seasonal treat. But, no matter how you flavor these, or which course you serve them, I really do hope you give them a try soon. Enjoy!


Ingredients for 4 to 6 Sweet Potato Soufflés:
2 teaspoon room temp butter to grease ramekins (mine were 5 oz. size)
4 large room temperature eggs, separated
1 cup mashed sweet potatoes
1 teaspoon kosher salt, or to taste
pinch of cayenne
1/4 cup milk                                                 
crispy fried sage leaves to garnish, optional

Tuesday, September 25, 2018

Avocado Ricotta Crostini – Start Spreading the News

Michele and I were in Oakland recently, at a restaurant called Southie, when I saw something I’d never seen before; avocado and ricotta cheese paired together on a crostini. I didn’t order it, but was fascinated by the idea, and eventually it turned into what you see here.

By the way, everything we did have was great, so if you’re in the area, check them out. I don’t do a lot of shout-outs here, but that'll make me feel a little better about stealing their appetizer. They actually did theirs with the cheese spread on first, and then sliced avocado placed over the top, but I decided to go for something a little easier to serve, and went with a spread instead.

I found this to be a very delicious combination that was sort of unusual, and yet familiar at the same time. I did roughly equal parts cheese and avocado, but of course you can play around with this ratio, depending on your mood. The same goes for the garnishes, where any number of fresh, or pickled seasonal vegetables would work wonderfully, as would a scattering of crispy bacon.

As you know, we’re heading straight into the heart of entertaining season, and no matter what you decorate yours with, these beauties would make for a great appetizer or snack, which is just one reason I really do hope you give these avocado ricotta crostini a try soon. Enjoy!


Ingredients for about 6 appetizer-sized portions:
1 large ripe Hass avocado
3/4 cup ricotta cheese (or more or less depending on the ratio you want)
1/2 lemon, juiced (you could also add some of the zest)
1 tablespoon finely sliced fresh basil
salt and cayenne to taste
sliced cherry tomatoes and radishes to garnish
drizzle of olive oil
pinch of sea salt and freshly snipped chives for the top

Friday, September 21, 2018

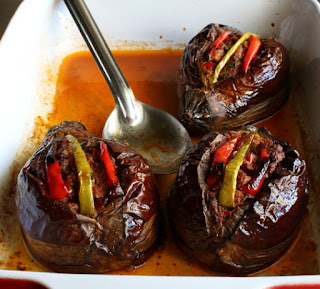
Turkish Stuffed Eggplant (Karniyarik) – Splitting Bellies

“Karniyarik” means “split belly,” which refers to the technique used to stuff them, although depending on the size of your eggplant, it could also refer to you after enjoying this delicious dish. By the way, this was my first time making these, and when I mentioned in the video only doing 15 minutes of research before filming, I wasn’t joking. So, you’ve been warned.

Having said that, I thought these came out really well, and I would only tweak a couple minor things next time. I’d sprinkle the insides with salt before stuffing, since there wasn’t enough in my filling to season them to my taste. I’d also toss in some chopped parsley, which would have added a little freshness to the dish, although the dried rosemary did work nicely.

Lastly, I’d take the advice I got on Twitter, and serve them with a yogurt sauce, like our famous tzatziki. That would be an amazing condiment for these, since the cold, acidic sauce would be a perfect foil for the rich, aromatic, slightly sweet flavor profile. 

Since I’m fully admitting not knowing what I’m doing, I welcome any and all tips and tricks, but most of all, I really do hope you give these a try. Enjoy!


Ingredients for 4 Turkish Stuffed Eggplant (Karniyarik:
4 medium sized eggplant
olive oil as needed
1 yellow onion, diced
1 teaspoon kosher salt, plus more to taste
4 cloves garlic, crushed
1 teaspoon freshly ground black pepper
1 teaspoon ground cumin
1/2 teaspoon cinnamon
1/4 teaspoon cayenne
1/2 teaspoon dried rosemary
1/4 cup freshly chopped Italian parsley (I didn’t add, but you should)
2 tablespoons tomato paste
1 pound ground lamb or beef
1 1/2 cups diced sweet and/or hot peppers
1 ounce (about 1 cup unpacked) finely, freshly grated Pecorino cheese, or whatever you’re into
1 cup chicken broth

- Roast eggplant at 400 F. until just barely soft, stuff, and continue baking until very tender.
-->

Friday, August 31, 2018

My Big Fat Greek Salad and Its Big Fat Unoriginal Name

I had a feeling I wasn’t the first person to think of this cinematic play on words, but like I said in the video, so many other people called this a big fat Greek salad, I figured I wouldn’t get in too much trouble. If I had to guess, it was probably the caterer on the set of the movie who first coined the name, or at least I hope so.

This is such a simple salad that there’s no need for me to share a bunch of tips and tricks, although I will reiterate the most important instruction of all.  Be sure to toss the salad with the vinegar first, before adding the olive oil. If you don’t, it will not taste as good. Which reminds me, giving the amounts here is very difficult, since this really should be made to your tastes, so please use the ingredient list below as a very rough outline.

If you need to make this the day before, I suggest making the dressing separate, and then mixing everything before the event.  I think this should only be dressed about 30 to 60 minutes before service for maximum enjoyment, but that’s just my approach, and some folks prefer an overnight marination. Regardless of how long you let your ingredients “marry,” you’re going to be enjoying one amazing salad, which is why I really do hope you give this a try soon. Enjoy!


Ingredients for 1 Big Fat Greek Salad:
2 large English cucumbers
2 cups halved cherry tomatoes
1/4 red onion, thinly sliced
1/2 red bell pepper, diced
1 cup sliced olives
2 tablespoons minced fresh oregano, or 1/2 teaspoon of dried
salt, freshly ground black pepper, cayenne to taste
1/4 cup red wine vinegar, or to taste
1/3 cup olive oil, or to taste
4 to 6 ounces feta cheese

Tuesday, August 28, 2018

Cabbage Patch Halibut – Come On, Use Your Head

Don’t worry; this cabbage-wrapped fish recipe has nothing to do with those creepy dolls. I just thought “cabbage patch halibut” sounded a little more enticing that the other names I was considering. 

Although, anything with the word cabbage in it isn’t going to have people’s mouths watering, which is how we got “coleslaw.” Despite all that, this really is one of easiest, and most delicious ways you can cook fish. 

The leaf not only keeps the halibut moist, but also holds all your assorted garnishes and seasonings tight against the meat, which creates an even more intensely flavored final result. Just be sure to save the rest of the head, since once chilled, and sliced thin, it makes for a very interesting salad. Or simply slice it thickly, and fry it up with a few sausages.  

This technique should work no matter what fish and ingredients are used, but you may have to adjust the cooking time. The type, size and shape of your fish filet are all variables that affect how long this is going to take. Best to check with a thermometer, and I generally go to for something between 130-135 F. for halibut, but other fish have different target temps, so do some research.

One last tip is to make sure you cut your other ingredients nice and thin, so they’re able to cook during the relatively short roasting time. Other than that, you are only constrained by your imagination. So, whether you put your own twist on this or not, I really do hope you give it a try soon. Enjoy!


Ingredients for 2 Portions of Cabbage Patch Halibut:
2 teaspoons butter for the pan
2 boneless, skinless halibut filets (about 7 ounces each)
salt and cayenne to taste
2 large steamed cabbage leaves
1 tablespoon thinly sliced fresh ginger
1 Fresno chili pepper, thinly sliced
2 tablespoons sliced green onions
1 tablespoon soy sauce
1/4 teaspoon sesame oil
fresh cilantro leaves to garnish
2 tablespoons miso butter (2 tablespoons butter mixed with 1 or 2 teaspoons of white miso, or to taste)

Friday, August 10, 2018

Spicy Pork & Vegetable Tofu – Probably Not Mapo Tofu

This might look like I was trying to make a version of a famous Chinese dish called mapo tofu, but that's not the case, and in fact, I'm pretty sure I was making this before I knew what mapo tofu was. And now that I’ve addressed the people that were going to complain this isn’t authentic, we can continue.

I'm assuming that whatever I did get this idea from was most likely a version of mapo, but that's as far as it goes. Which reminds me, this is a great recipe to adapt to your own tastes, not only with the sauce ingredients, but also in regards to what vegetables you include.

Zucchini is our favorite, especially if you take the extra 15 minutes to salt it, but pretty much any dice-able seasonal vegetables will shine. So, please keep this one in mind as you browse the farmers market, but no matter what you put in, I really do hope you a give this delicious tofu dish a try soon. Enjoy!


Ingredients for 4 Portions:
1 1/4 pounds ground pork
1 pound firm tofu, cubed (my package was 14 ounces)
handful of sliced green onions
minced hot chili peppers, as much as you like
3 small zucchini, cubed, toss with 1 tablespoon kosher salt (rinse after 15 minutes)
freshly chopped cilantro to finish
sliced green onions for the top

For the sauce:
3 tablespoons Korean chili paste aka Gochujang, or other chili paste product to taste (click here to read a little more about Gochujang)
1/3 cup rice vinegar
1/4 cup hoisin sauce
2 tablespoons soy sauce
1 tablespoon ketchup
1 tablespoon sesame oil
4 cloves minced garlic
1 tablespoon finely grated ginger

Tuesday, July 31, 2018

Summer Tomato Tart – Better Than a Nude Beach

One of these days Michele and I will travel to the south of France, where we’ll make it a point to eat this amazing tomato tart at least once a day. It’s going to be hot, since we’ll have to go in the middle of summer, so we can enjoy the best possible tomatoes, but that’s fine, as long as they don’t run out of chilled rosé.

While beautiful in its own way, this tart doesn’t necessarily look like it’s going to be one of the most delicious things ever, but then you bite into the crispy, buttery crust, which is the perfect delivery system for the tangy Dijon, and sweet, caramelized tomatoes, and you’re like, yeah, that guy was right.

By the way, if you want to learn some really good French swear words, call this a “French pizza” in front of a French chef. They don’t quite agree with the analogy. However, there is one common denominator. Both can be ruined with too much topping. Just like we don’t want to overload a thin-crust pizza with a ton of sauce and cheese, we need to be restrained with this as well.

One layer of tomato is plenty, since more than that will make for a too wet tart, which means your pastry will not stay crispy. Besides that, there’s not much that can go wrong, unless you use subpar tomatoes. But, since we’re right in the middle of peak season that shouldn’t be a problem, so I really do hope you give this tomato tart a try soon. Enjoy!


Ingredients:
enough puff pastry to make your shell
enough extra-strong Dijon mustard to sauce the inside
enough sliced tomatoes to fill the tart with a single layer
salt and freshly ground black pepper, to taste
several big pinches of Herbes de Provence (or an Italian herb blend if you can’t find)
extra-virgin olive oil, as needed
freshly grated Parmigiano-Reggiano, as needed
fresh chopped herbs to garnish

- Pre-bake tart shell for about 10 minutes at 400 F.
- Let cool about 10-15 minutes, then fill and bake at 400 F. for about 25-30 minutes, or until pastry is well-browned and crisp.

Tuesday, May 22, 2018

Celery Sorbet – It Only Sounds Crazy

If you set out to make an ice cream or sorbet from a vegetable, celery wouldn’t be your first choice, but nevertheless, these unremarkable ribs produce a shockingly delicious frozen treat. And, I said “frozen treat,” instead of dessert for a reason, since this has as many savory applications as sweet ones.

The first time I ever had something like this, it was used to garnish a plate of salmon gravlax. It was presented next to the cold, cured fish, on a pile of crispy rye breadcrumbs, and the combination of tastes, textures, and temperatures truly was incredible. After that meal, I promised myself I’d figure out how to make this stuff no matter how long, or many failed attempts it took. Luckily, Mark Bittman had already posted a recipe for it in the Times, so I ended up nailing it on the first try, but still, promise kept.

If you don’t have an ice cream maker, there are like a hundred hacks online for how to do this without one, or you can simply use the method highlighted in our strawberry granite video, which will produce something closer in texture to a snow cone, but amazing nonetheless. No matter what you use, I really do hope you give this very unusual, but absolutely delicious celery sorbet a try soon. Enjoy!


Ingredients for 6 portions:
1 pound (after trimming) sliced celery
1 cup white sugar
1 cup cold water
pinch of salt (I used 1/8 teaspoon)
1 lime, juiced

Friday, April 6, 2018

Sweet Potato Pan-Dumplings with Bacon Butter – Good Save

What started out as a tragic, waterlogged disaster of a sweet potato dumpling attempt, turned into a triumph we’re calling  “pan-dumplings.” As usual, I did little to no research, so someone may have already invented pan-dumplings, but until I hear from you, I’ll be taking the credit.

I really liked being able to spoon the dough/batter directly into the pan, and cutting out the boiling step made these faster, and we have one less pot to wash. The bacon butter was very nice, but I can think of a dozen sauces that would work with these. If you’re doing it as a main course, anything goes, but as a side dish, I’d keep it simple, as we did here.

Since this was sort of an experiment, I wasn’t paying too close to the exact amounts, but the list below must be pretty close. You can play around with more or less flour, and/or cheese, and cook test dumplings until you lock it in. I wanted something with the taste of roasted sweet potatoes, but with more of a gnocchi-like texture, and I think this was pretty close, which is why I hope you give these pan-dumplings a try soon. Enjoy!


Ingredients for 2 large or 4 smaller portions:
12 ounces cooked sweet potato
1 large egg
1/4 cup goat cheese or cream cheese, plus more to garnish
1/2 cup *self -rising flour
1 teaspoon kosher salt, or to taste
freshly ground black pepper and cayenne to taste
sliced green onions to top

* To make your own SRF, for every cup of all-purpose flour combine 1 1/2 teaspoons baking powder and 1/2 teaspoon fine table salt.